Referral Conversations (Conversation Builder)
- Get Started
- Automations
- Patient Channel
- Patient Facesheet
- Collaborative Inbox
- Lines & Resources Requests
- Lines, Events, Resources
- Analytics
- Platform Settings and Configuration
- Users and Groups
- Campaigns
- SMS Basics
- Troubleshooting and FAQ
- Conversation Builder
- Add-Ons
- Release Notes
- Technical Specifications
- Referrals
- Self-Rescheduling
- Recalls
- Marketplace
Table of Contents
Create ConversationAdd Root Messages and Patient ResponsesSpanish TranslationsAdding Phone ConversationCall ForwardingEnable ConversationAdding Conversation Builder Smart Phrases in AutomationsDeliver Referral Automations using Conversation Builder, allowing you to automatically deliver a multi-step scheduling workflow to patients minimizing staff intervention. Additionally, Conversations built in Conversation Builder can automatically write back the patient’s response to your system of record (EMR).
When using Conversation Builder, it is important to note that English and Spanish are the only supported languages. If you need to support additional languages, consider using Artera's standard Automations.
Scenario
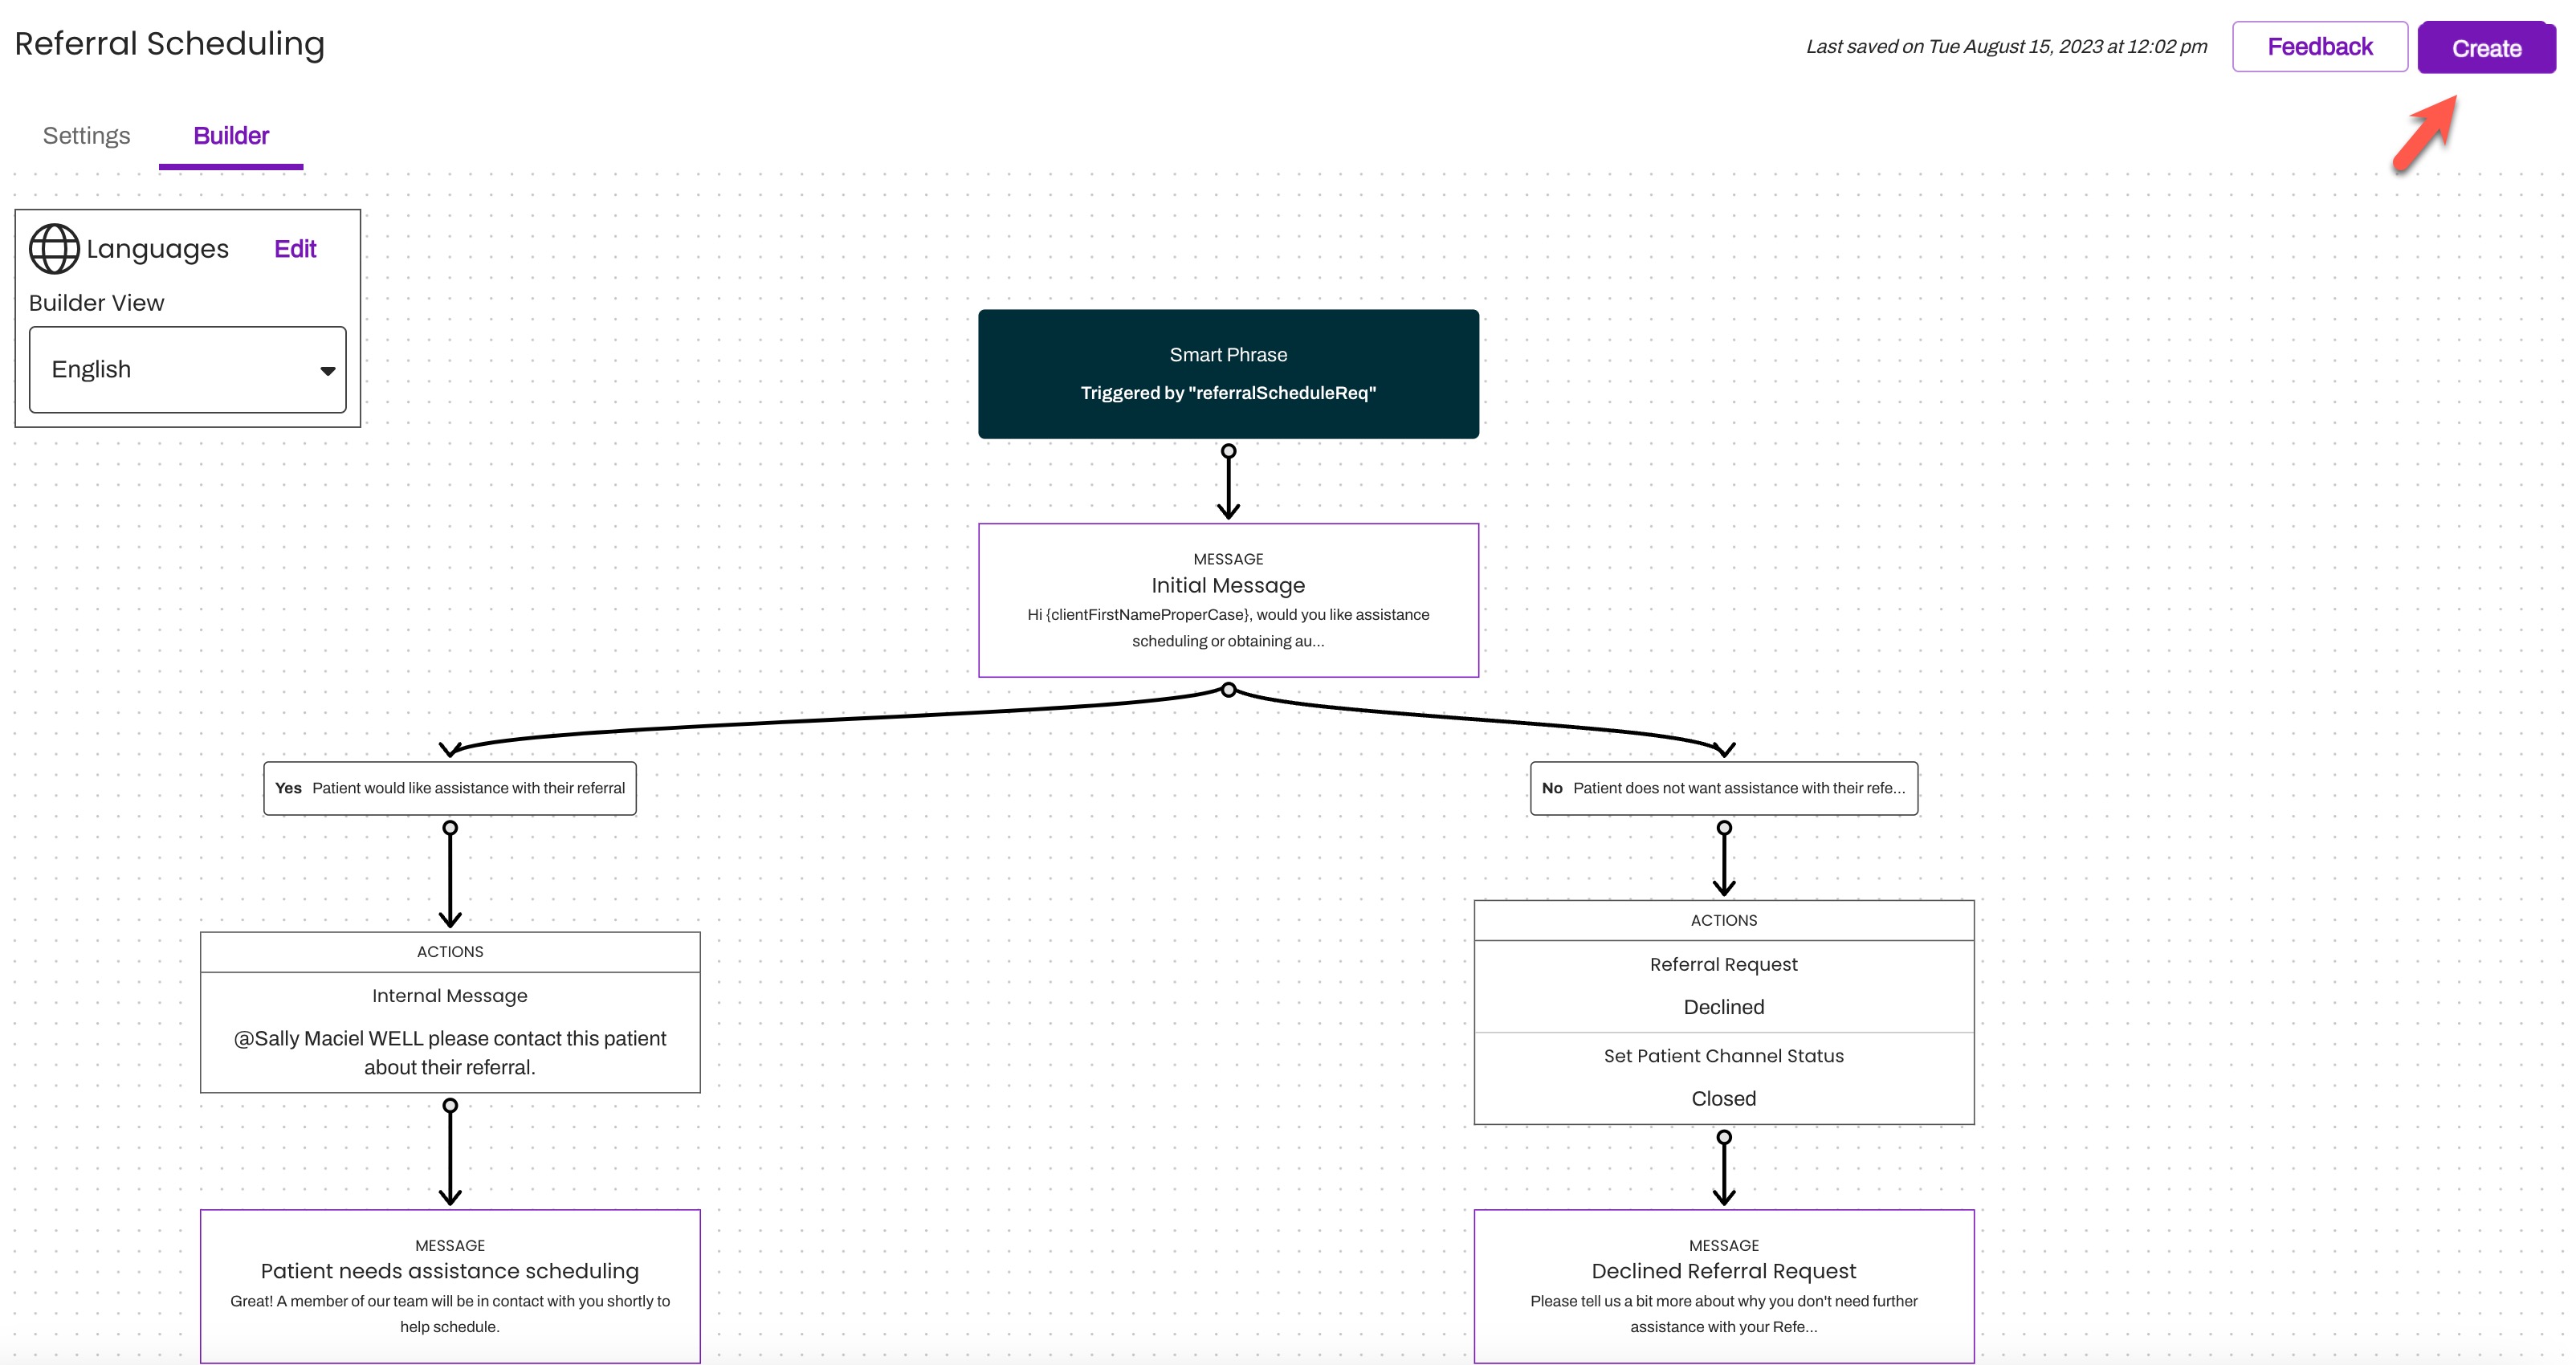
We have found that it is helpful to map out the desired Conversation flow before building it in the Conversation Builder. This article will focus on building the following Conversation into Conversation Builder and related Referral Automation. The goal of the Conversation is to have the patient call to schedule their Referral. If the patient does not want to schedule, the organization would like to understand why and capture that data.
.png)
Create Conversation
This section focuses on one specific Referral Conversation and does not provide a complete view of all Conversation Builder features. For thorough documentation on Conversation Builder, including Conversation nuances and Action details, click here.
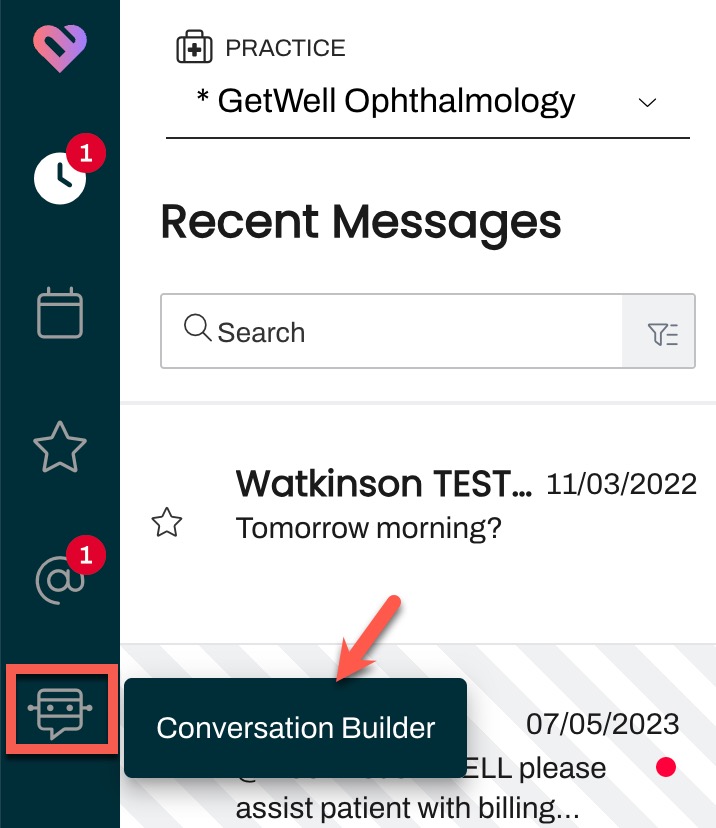
- From the Navigation Bar, click the Autobot icon and choose Conversation Builder from the pop-out menu
- Click Create New in the upper-right corner of the page
-
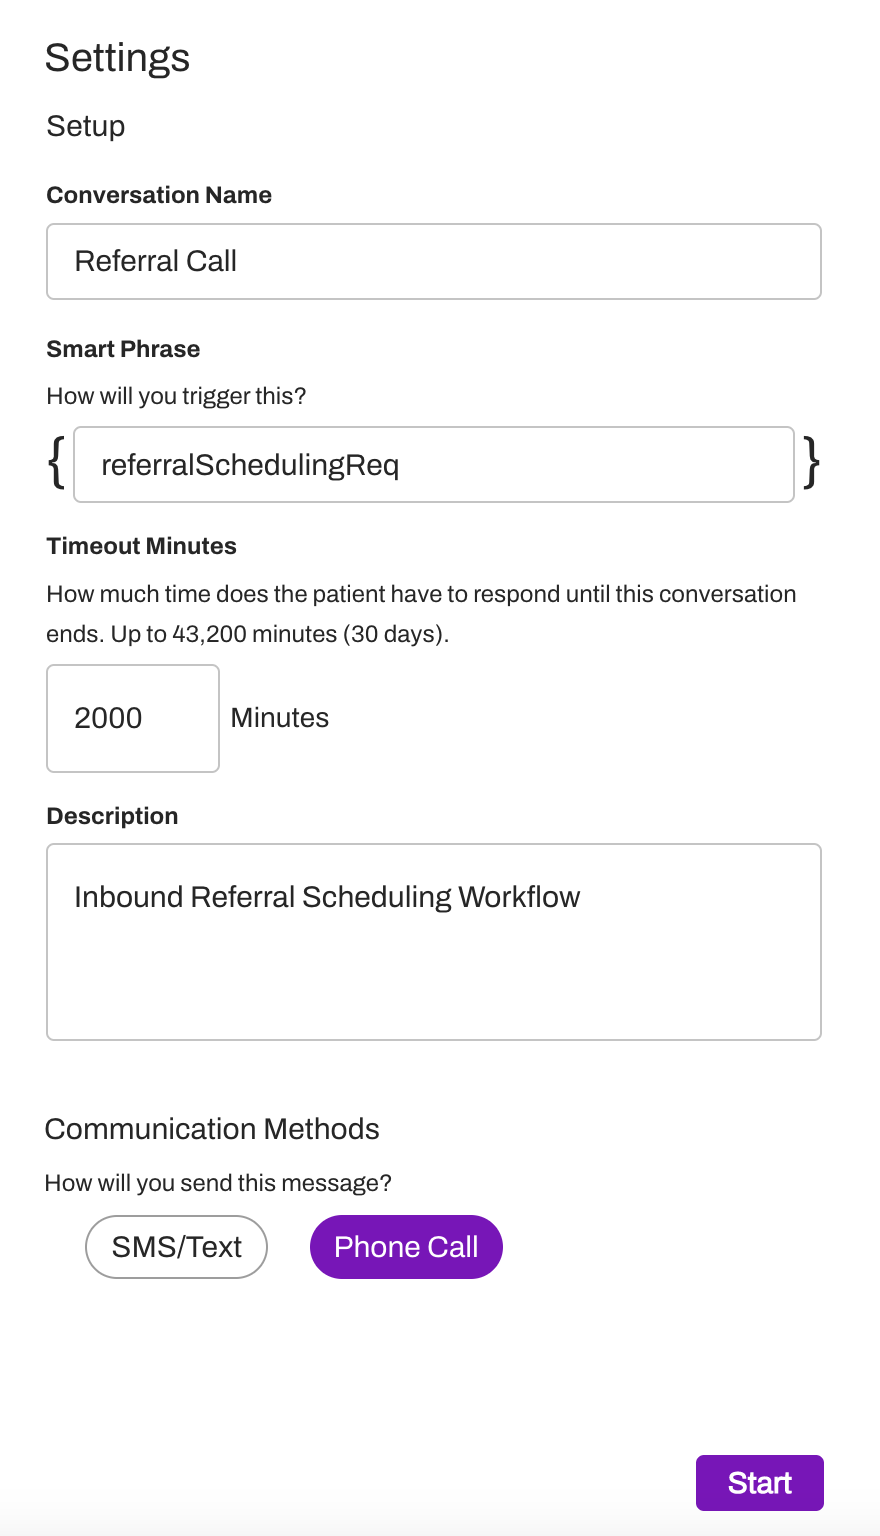
Fill in the Settings menu
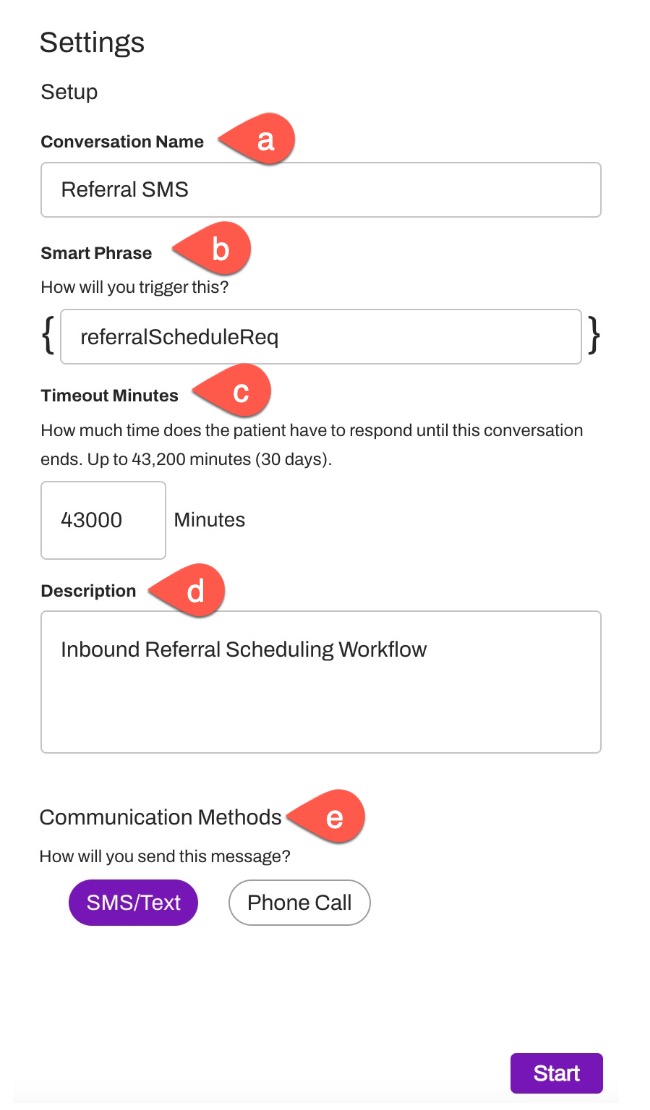
- Conversation Name: Enter the display name for the Conversation as it will appear on the Conversations page.
-
Smart Phrase: Create a custom Smart Phrase (without spaces) that will be used to trigger the Conversation. The same Smart Phrase can be used for SMS and Voice versions of the Conversation.
- For Referral-specific Automations, include 'Referral' at the beginning of the Smart Phrase (e.g. referralScheduleReq).
- Response Timeout in Minutes: Specify the time period that you would like the Conversation to be open to responses before the session is terminated. This value applies individually to each message sent.
- Description: Include a description of the intended use case and any relevant details you want to appear on the List page.
- Communication Methods: Determine whether you would like to create an SMS/Text or Voice Conversation.
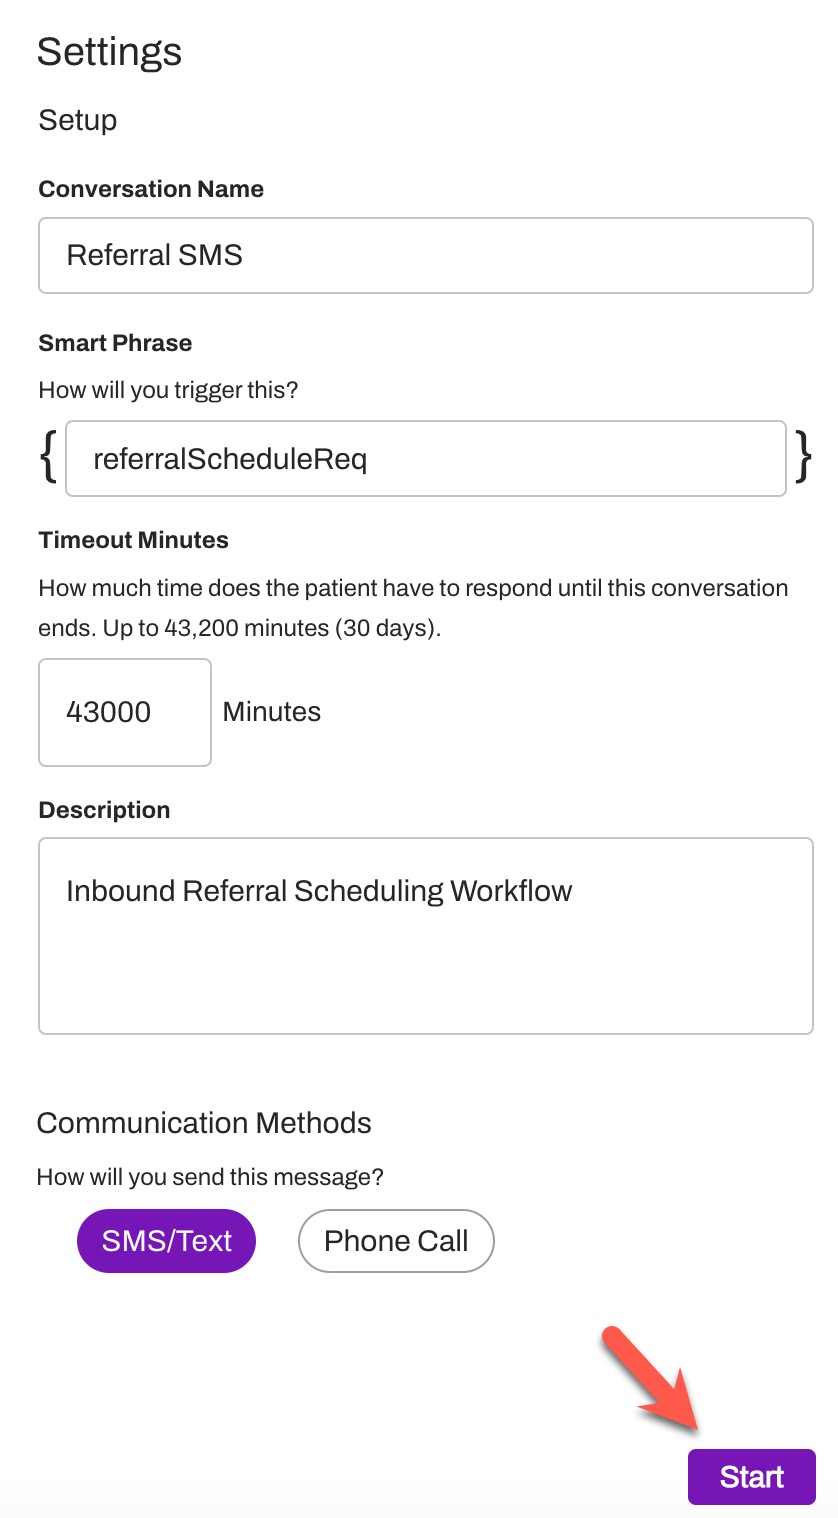
- Select Start once all Settings have been entered
Add Root Message and Patient Responses
Once you have completed the Conversation's configuration, you will be routed to the Builder view to begin building your messages. Note: You can update the Conversation's settings at any time by navigating back to the Settings tab.
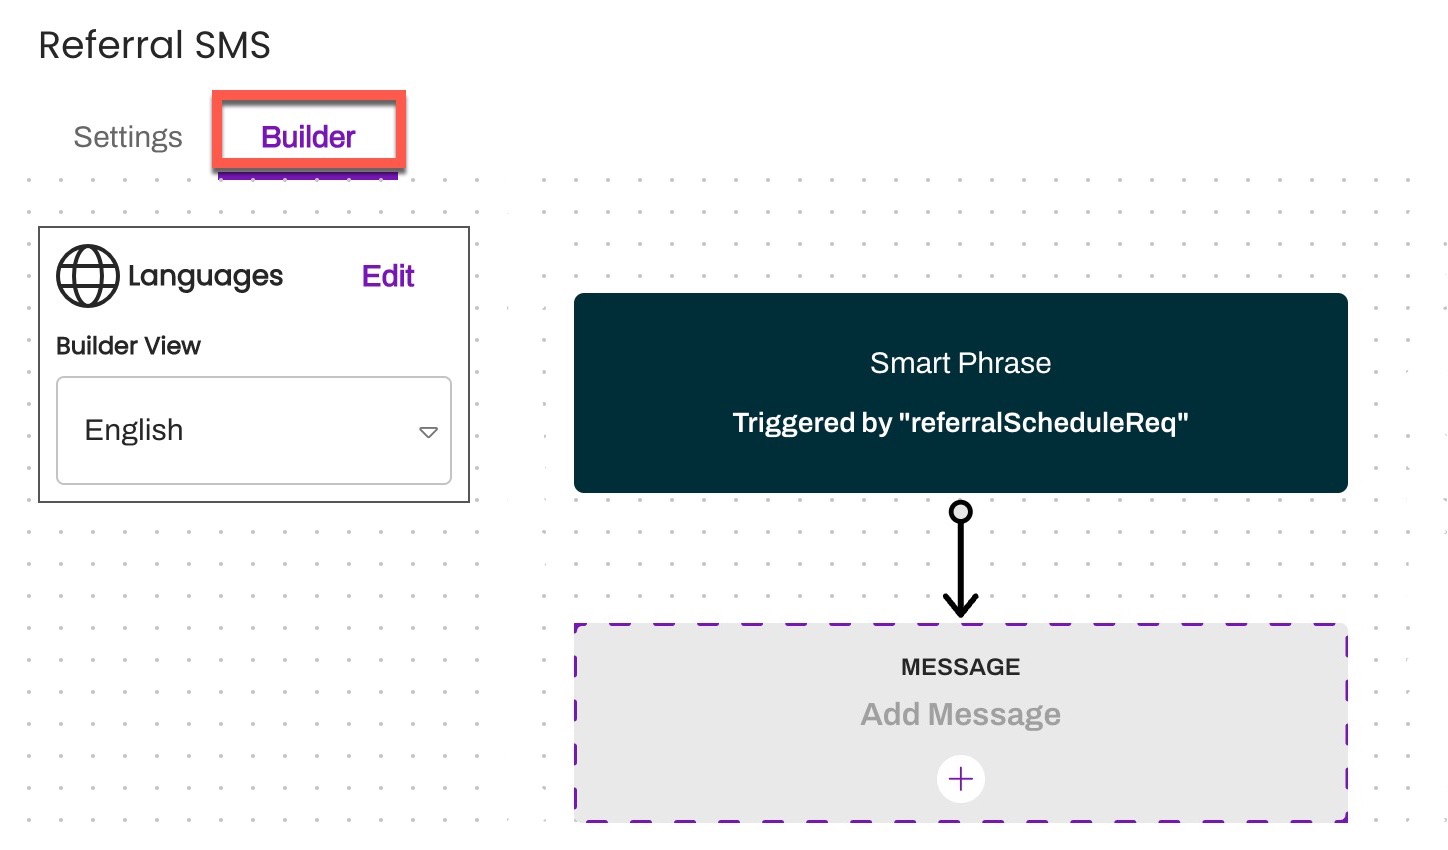
Process Steps
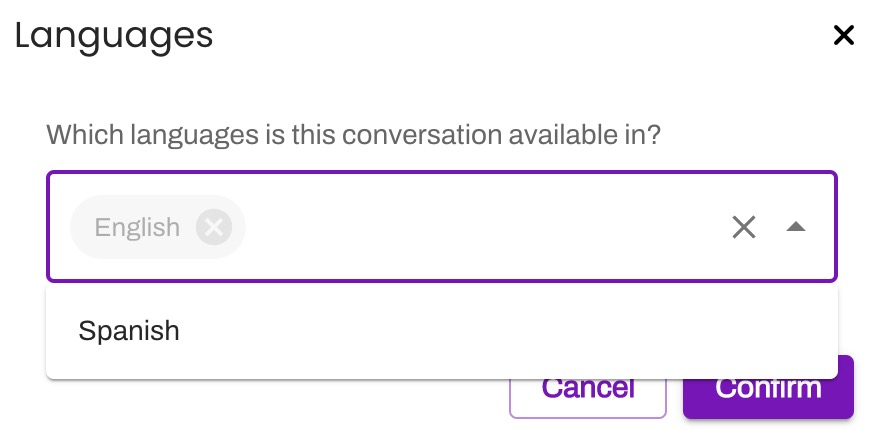
-
Indicate the languages you would like to support in the Conversation. English and Spanish are currently supported.
-
Create your first message by selecting the + within the gray Add Message box:

NOTE: In order to provide Referral writeback statuses to your EMR, a Referral Conversation must contain at least two messages.
-
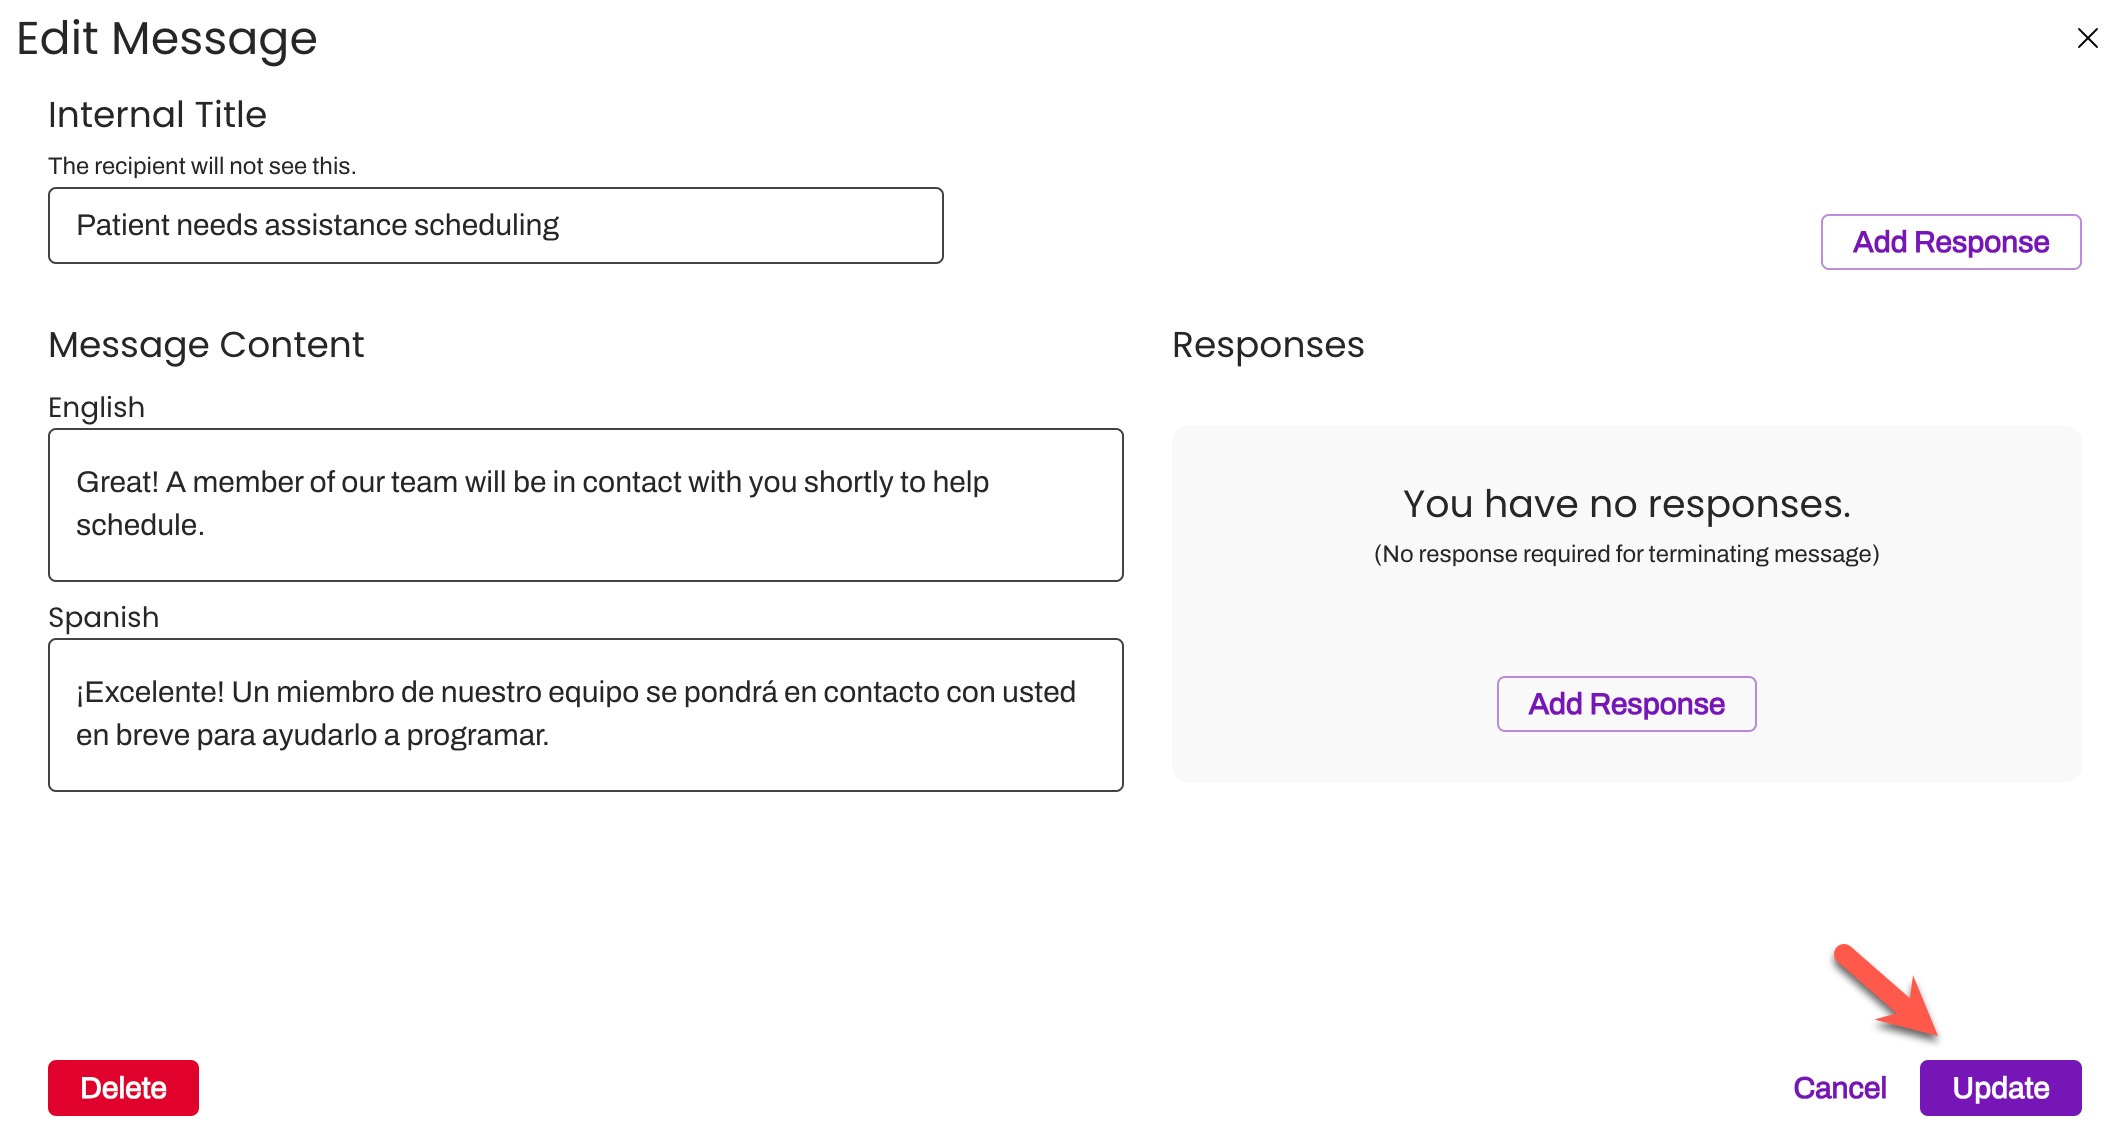
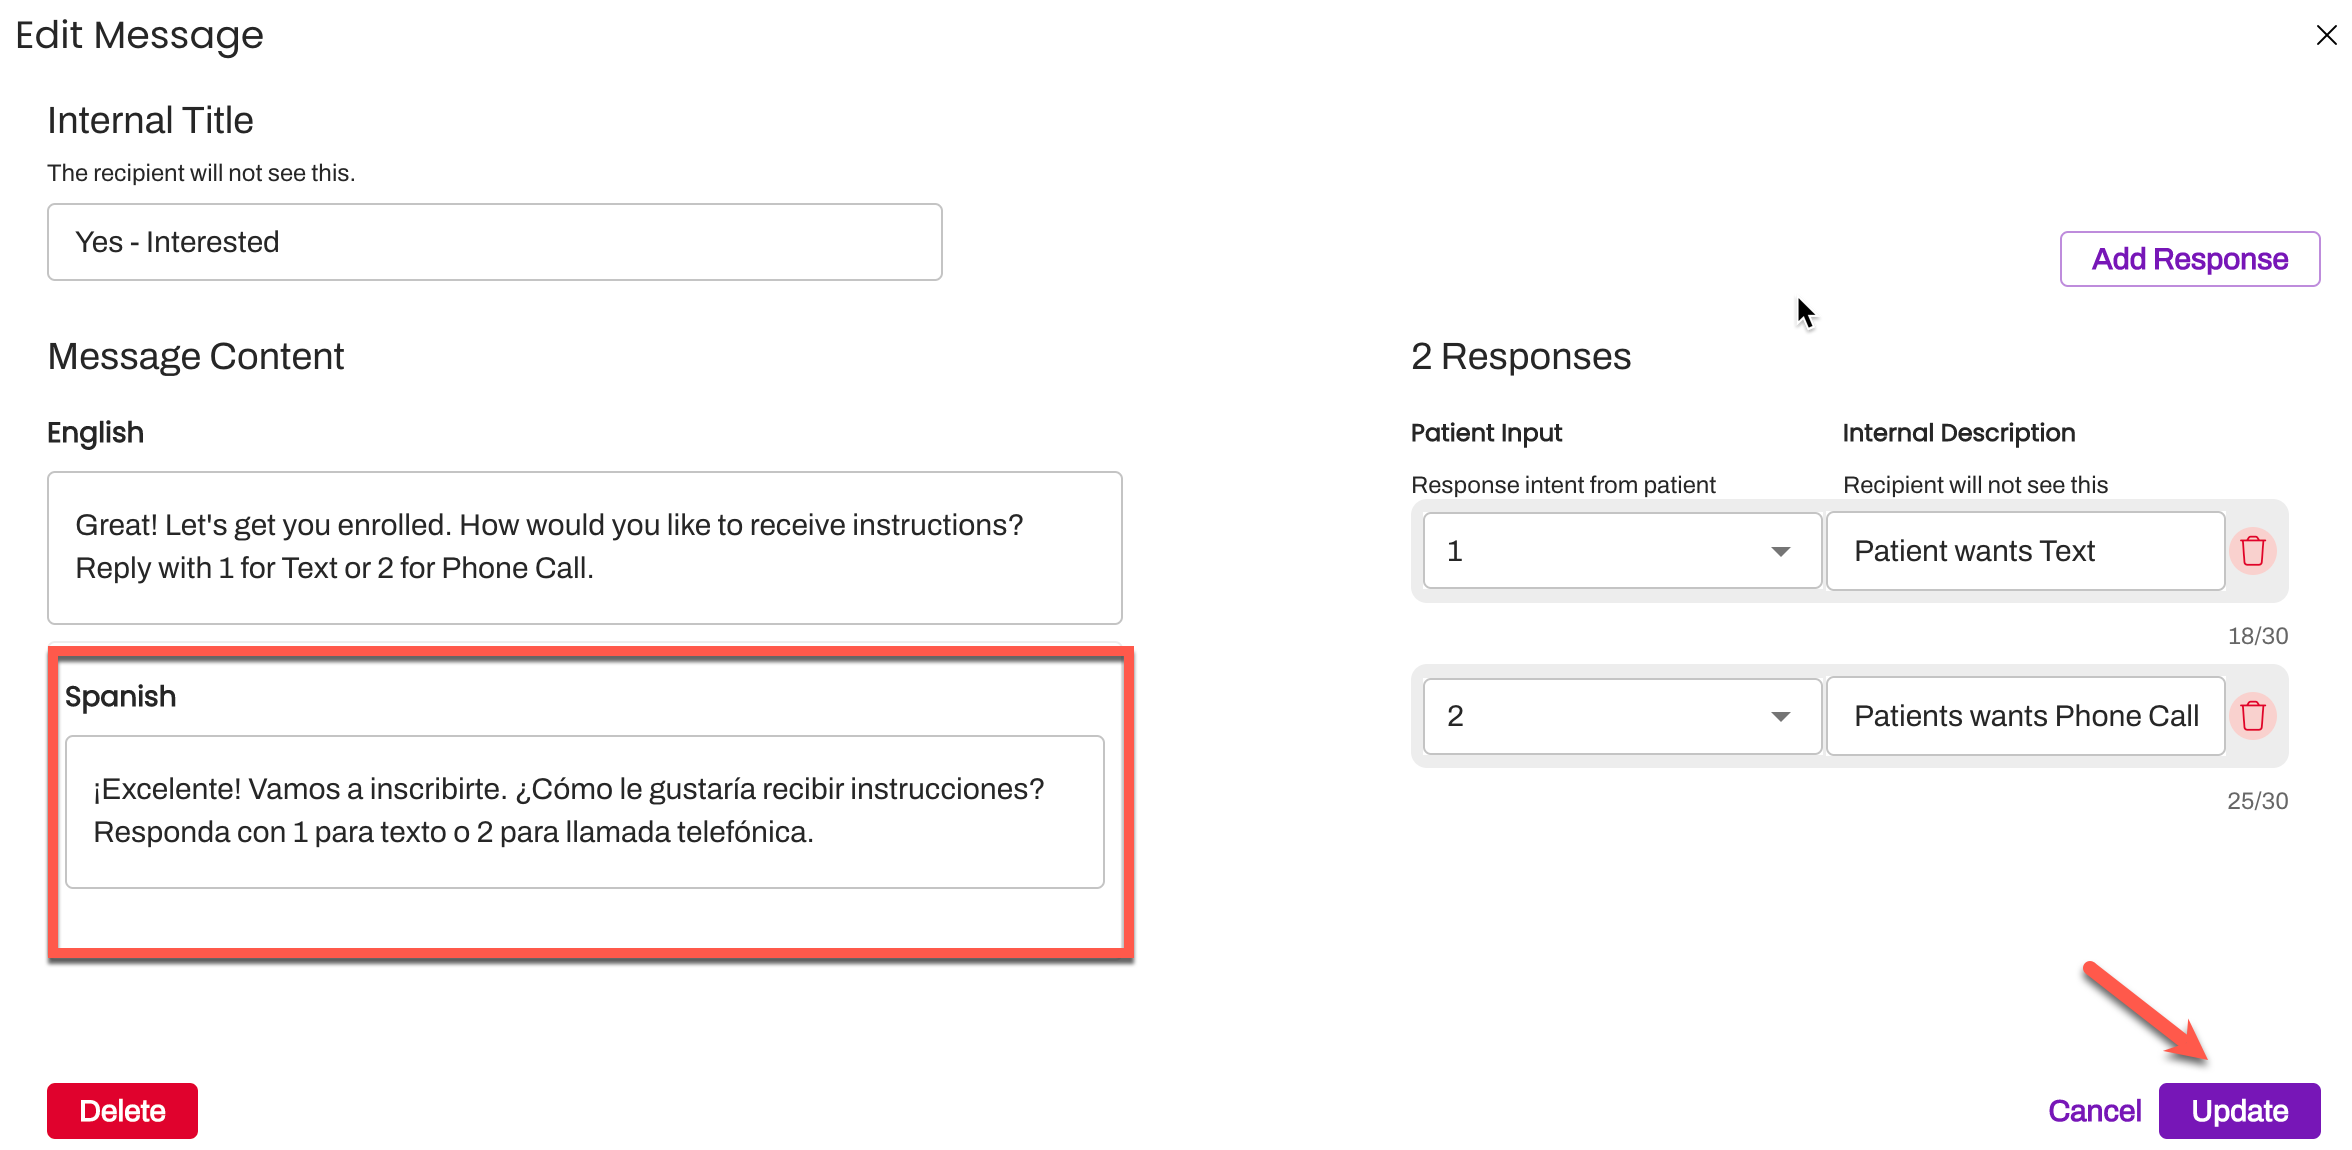
Once on the Create Message window, you will be presented with the following fields to complete. Once completed, select Update to create the outgoing message to the patient:

- Internal Title: An internal-facing label associated with the Conversation to provide easier search and identification of Conversations
- Message Content: This is the first message the patient will receive (known as the Root Message). Be sure to include the ask of the patient and expected responses. If you are including a Spanish translation, be sure to insert the Spanish message within the Spanish field.
-
Next, you will populate the Patient Responses based on the message. You will need to define one or more Patient Responses within your outbound message. These create the parameters for the patient's reply and allow you to define the proper branch of the Conversation the patient should receive next. Click Add Response.
-
Patient Input - Use the drop-down menu to select the response value. The following response options are available for selection:
- 0-10: In situations where the patient has more than two options, we recommend using numbers for the Patient Response options
- True, False
- Yes, No: In situations where the patient only has two response options, we often recommend choosing the Yes and No response options.
- Low, Medium, High
- Small, Large
- Unrecognized Response: Use Unrecognized Response to automatically respond to a patient who messages in something other than the defined variable ('No' in this example)
- Internal Description - Enter the associated message you want to appear in the Patient Channel for your staff to review. These messages will help give context to staff when they are reviewing the Conversation history.
-
Patient Input - Use the drop-down menu to select the response value. The following response options are available for selection:
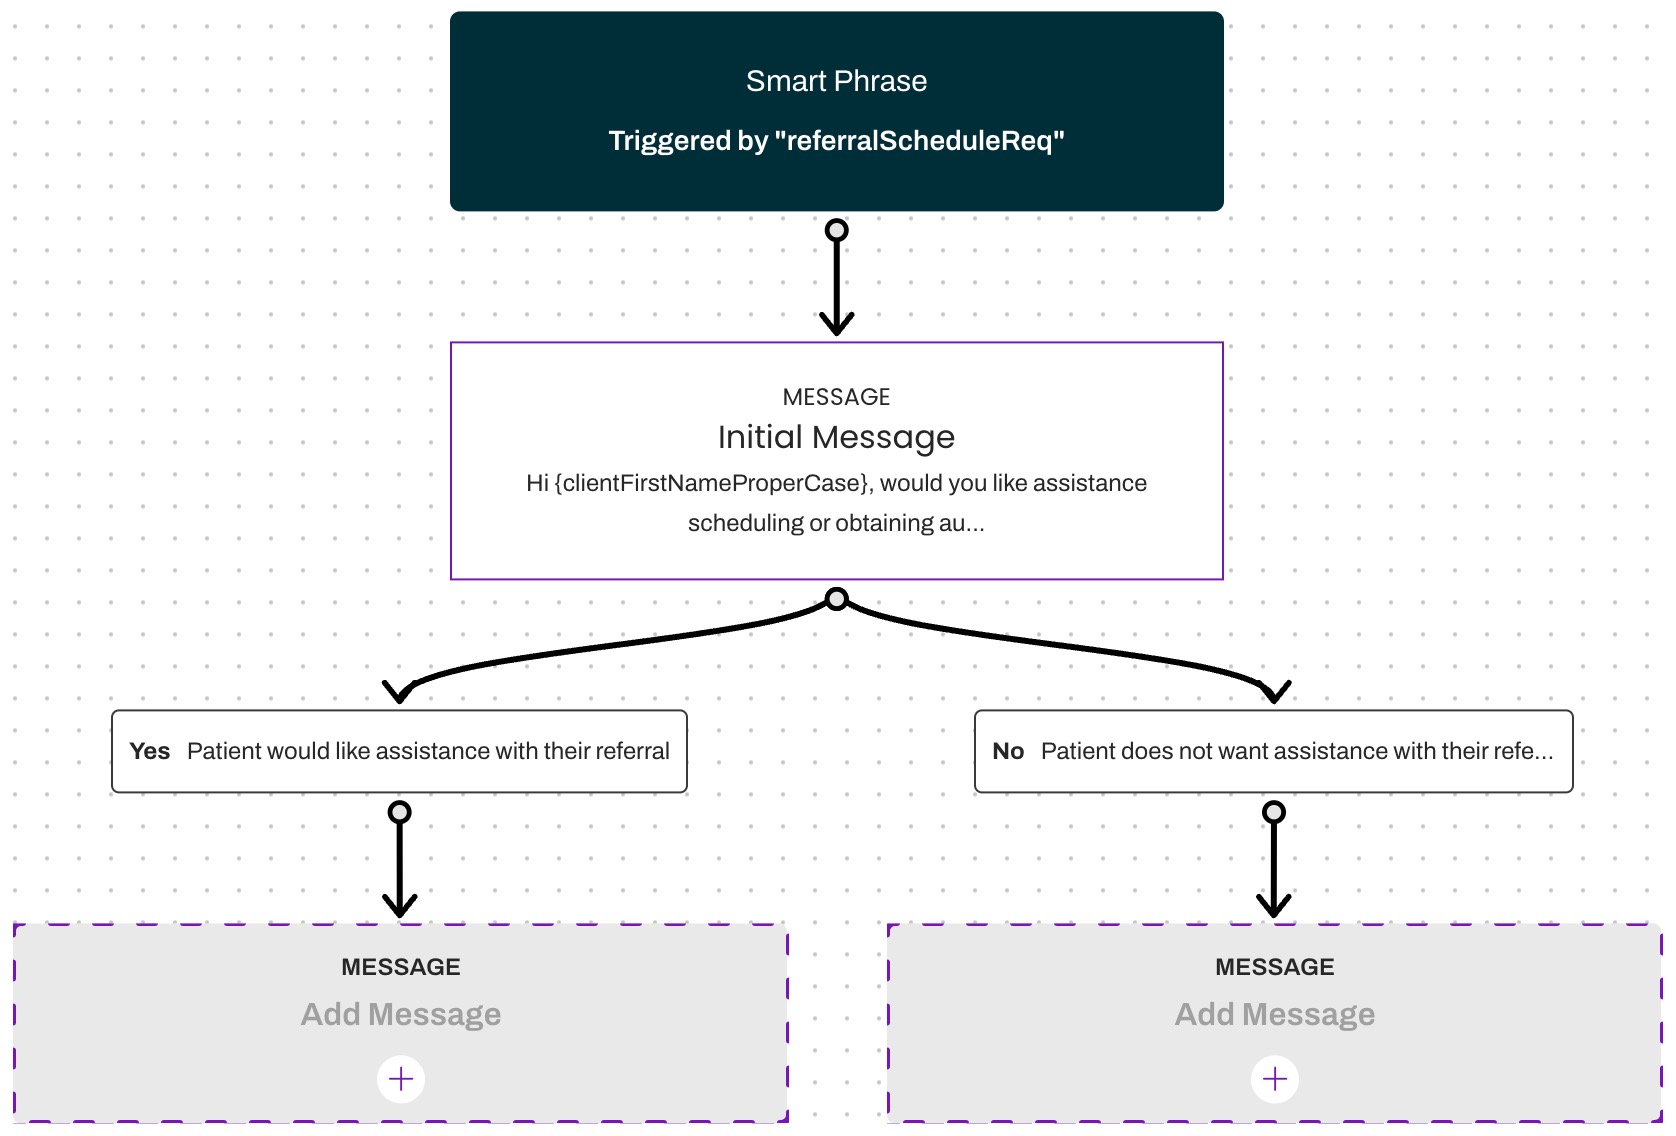
-
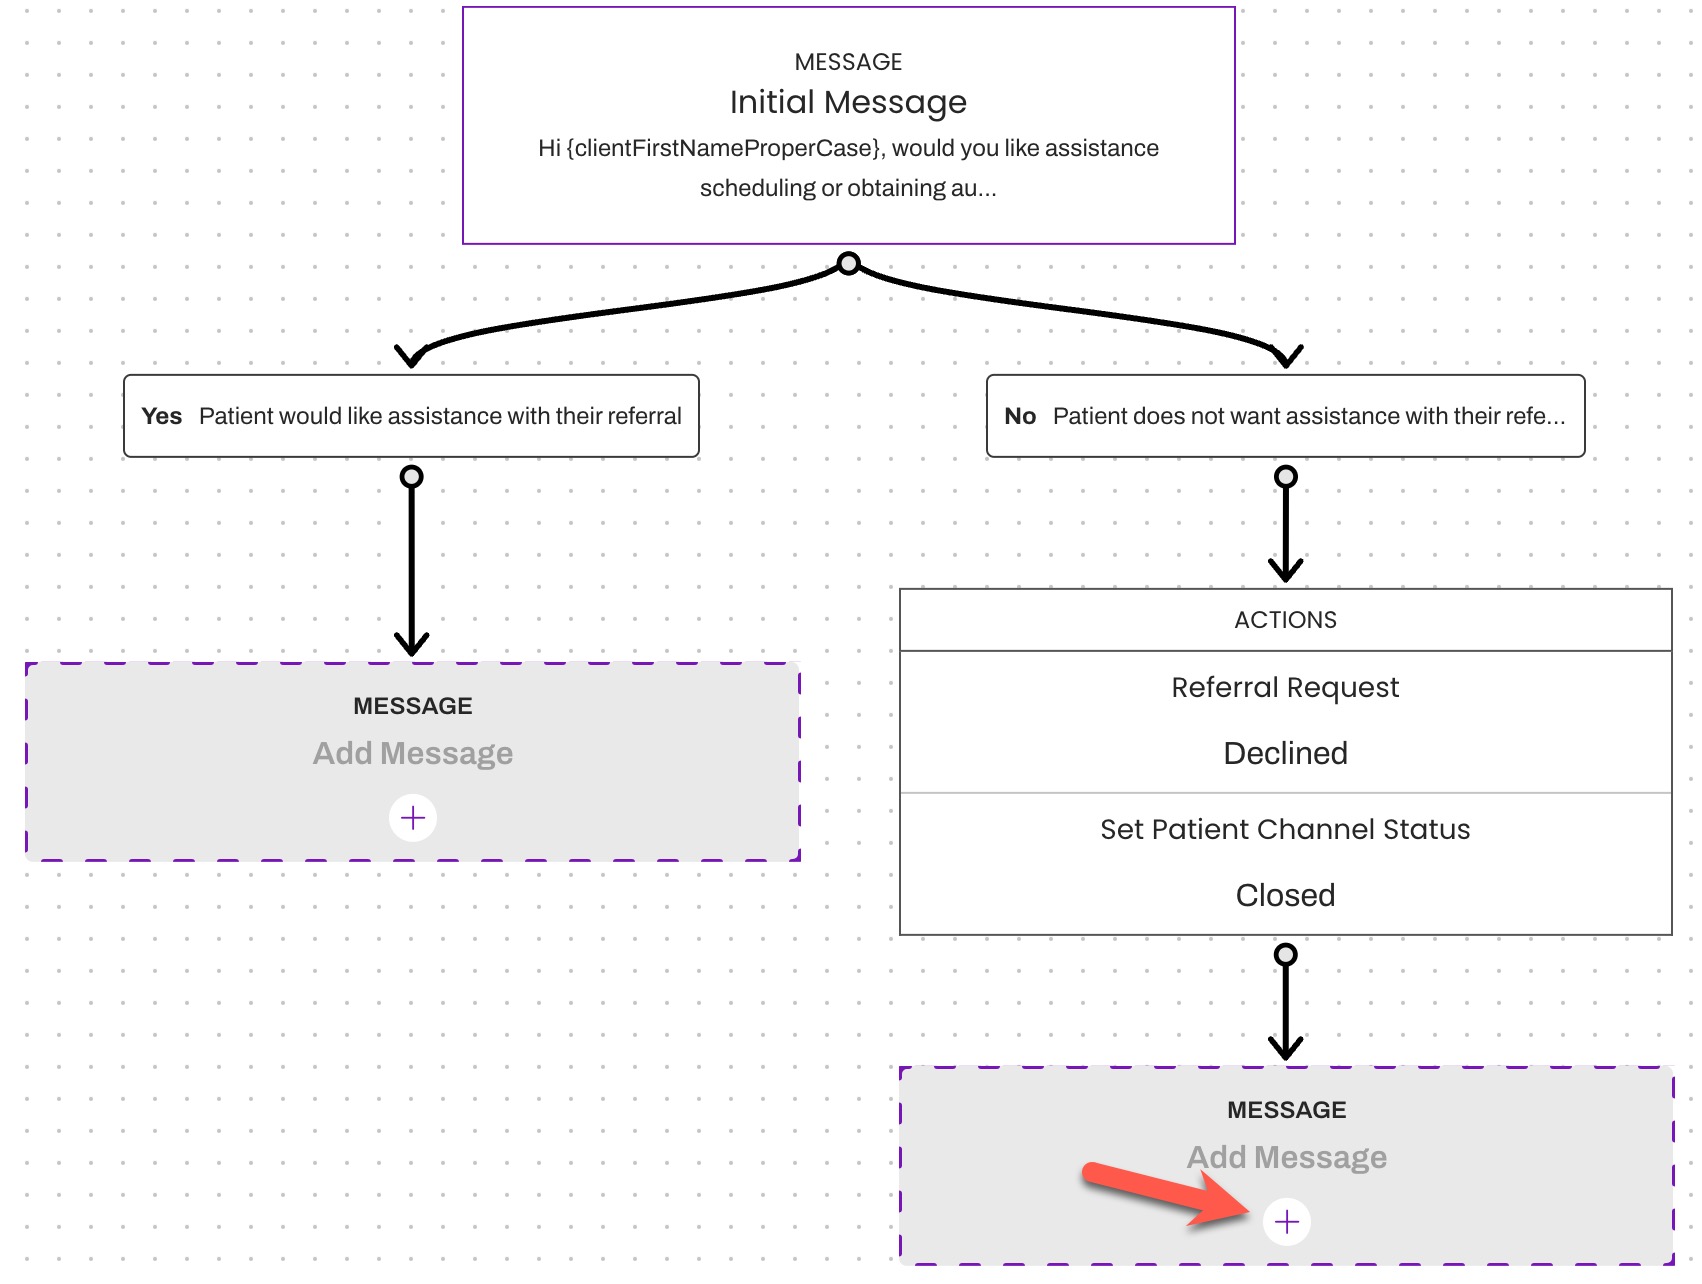
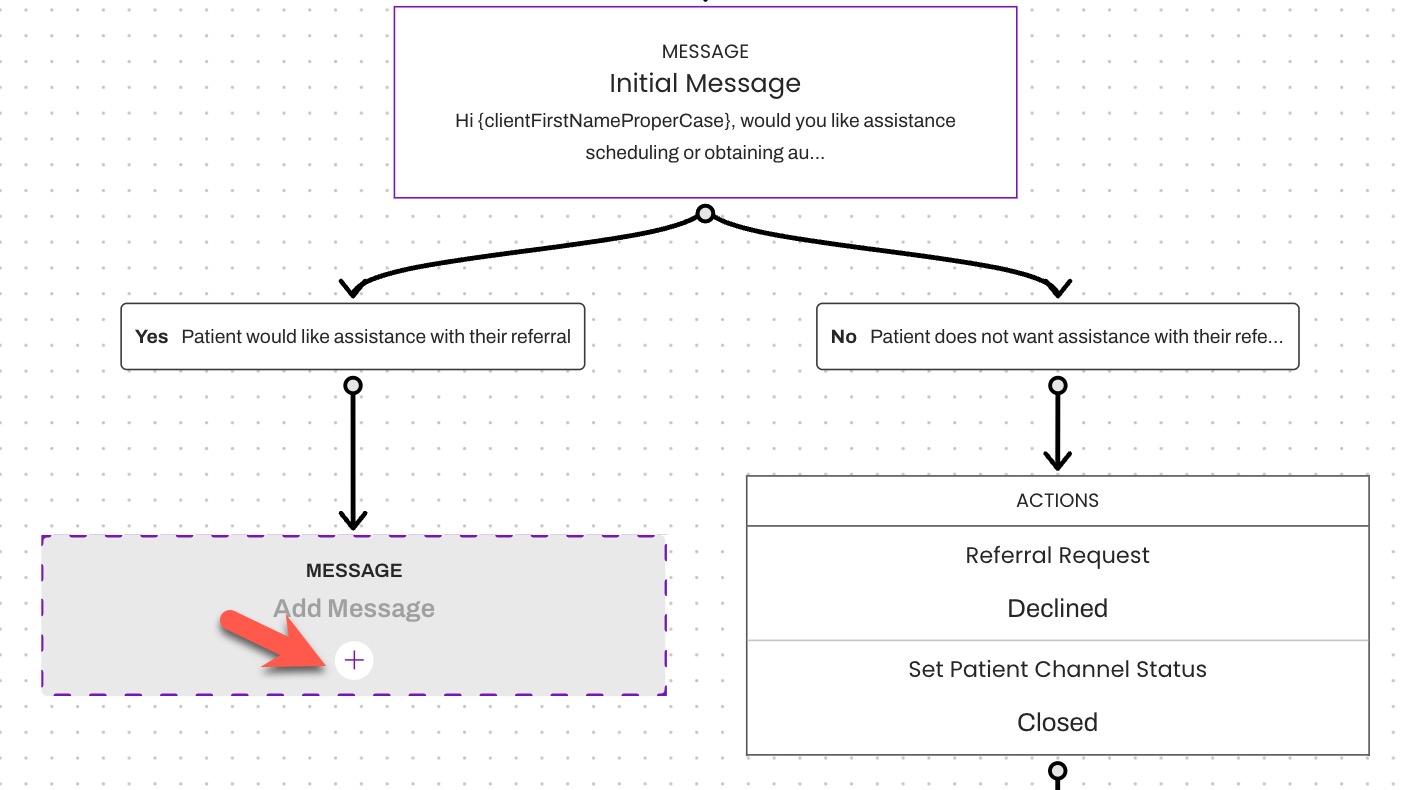
Once updated, the message tree will reflect your initial outgoing message and possible branches based on a patient's response:
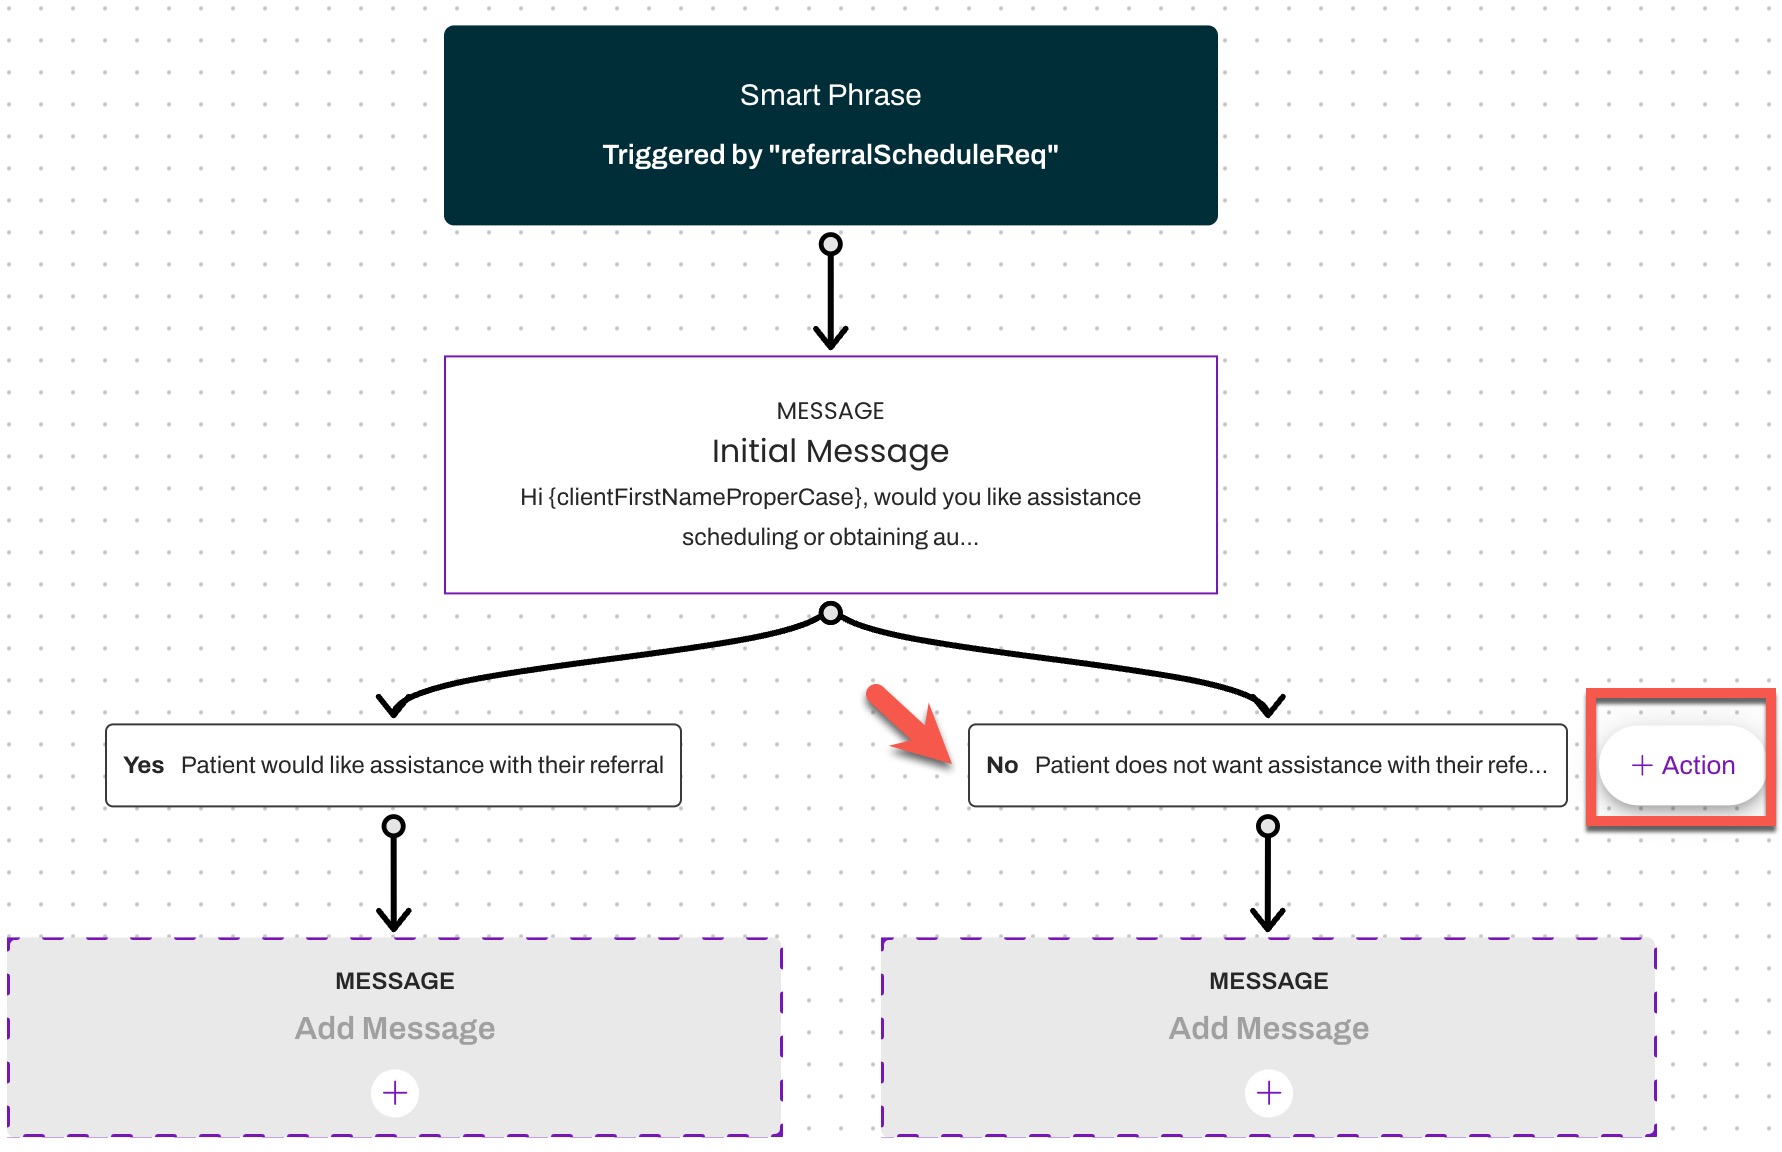
-
Next, let's add an Action for the 'No' Patient Response. To do this, hover over the Patient Response you wish to add an Action for and click the '+ Action' button that will appear
-
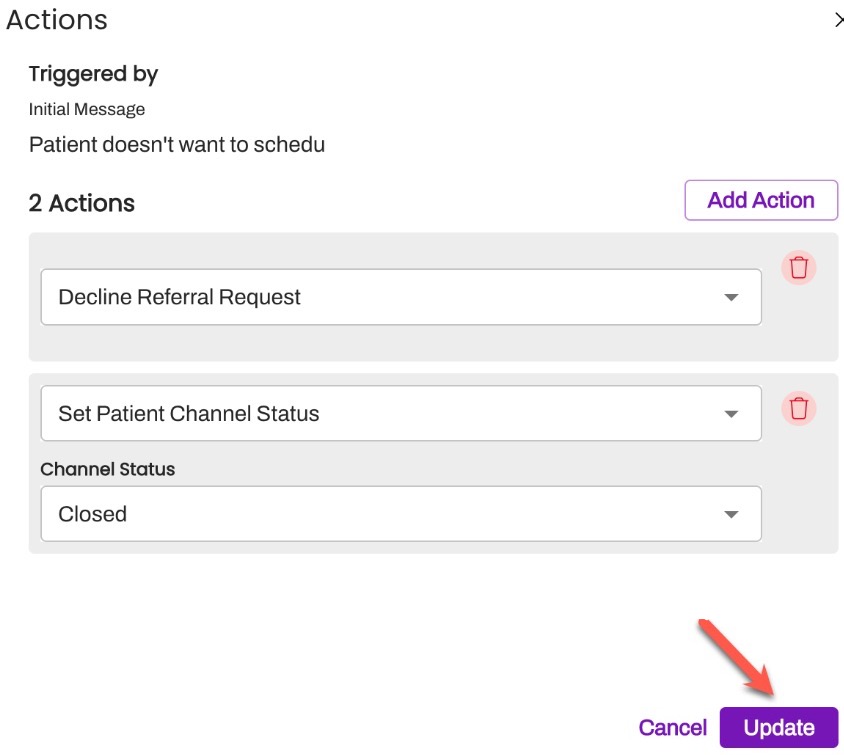
Select Add Action to choose the appropriate Action from the drop-down menu, Here, we can use the Action Types to control how Artera responds to this response from the patient. For this scenario, we are going to indicate that the patient declined the Referral Request and then we will close the Patient's Channel.
-
Next, we will add the next message in the Conversation by navigating to the gray Add Message box within the 'No' Patient Response branch and select the '+' to add the next message.
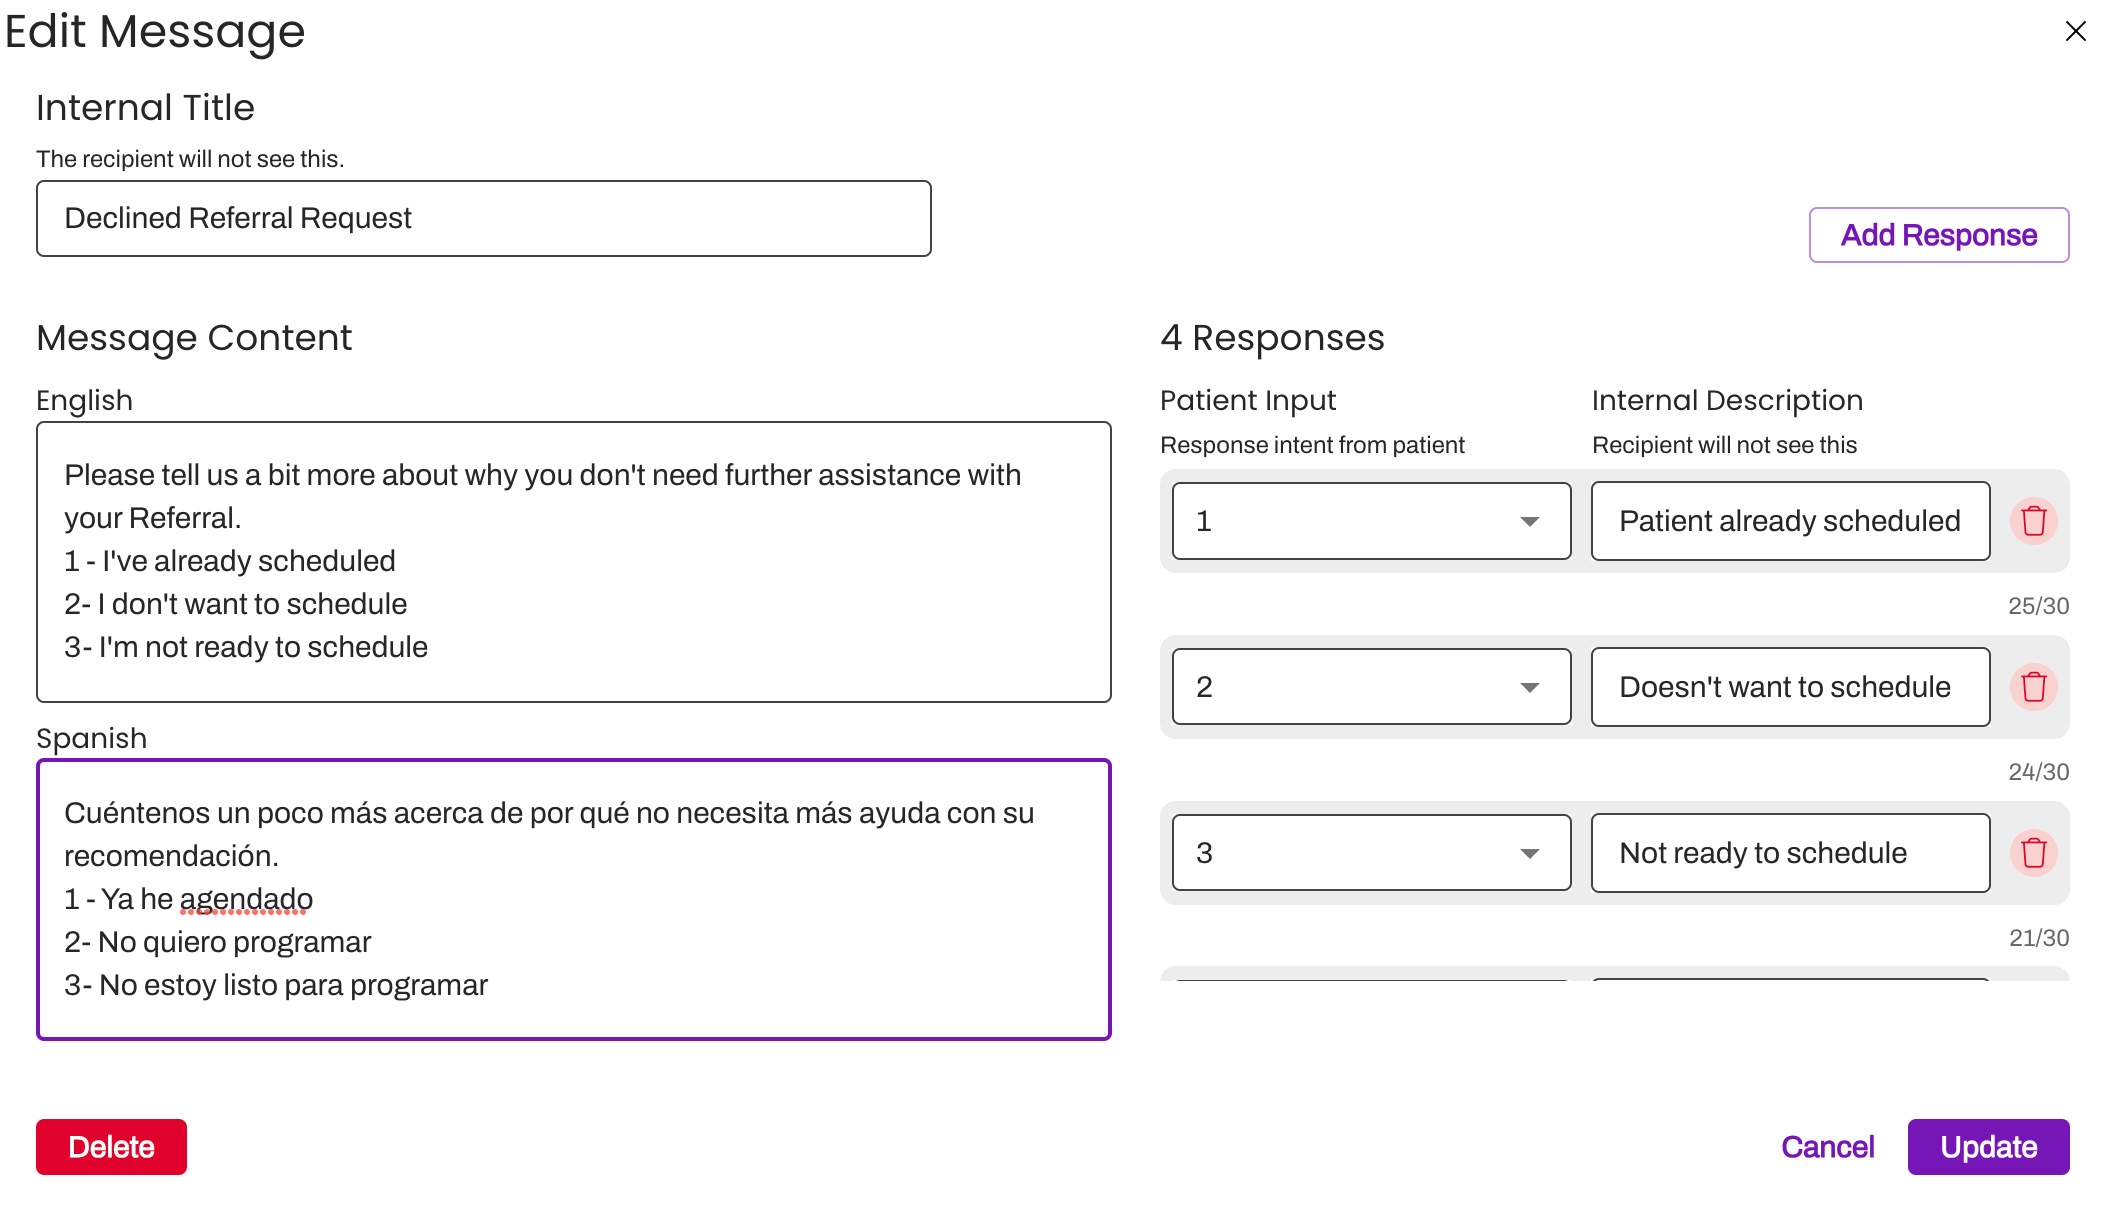
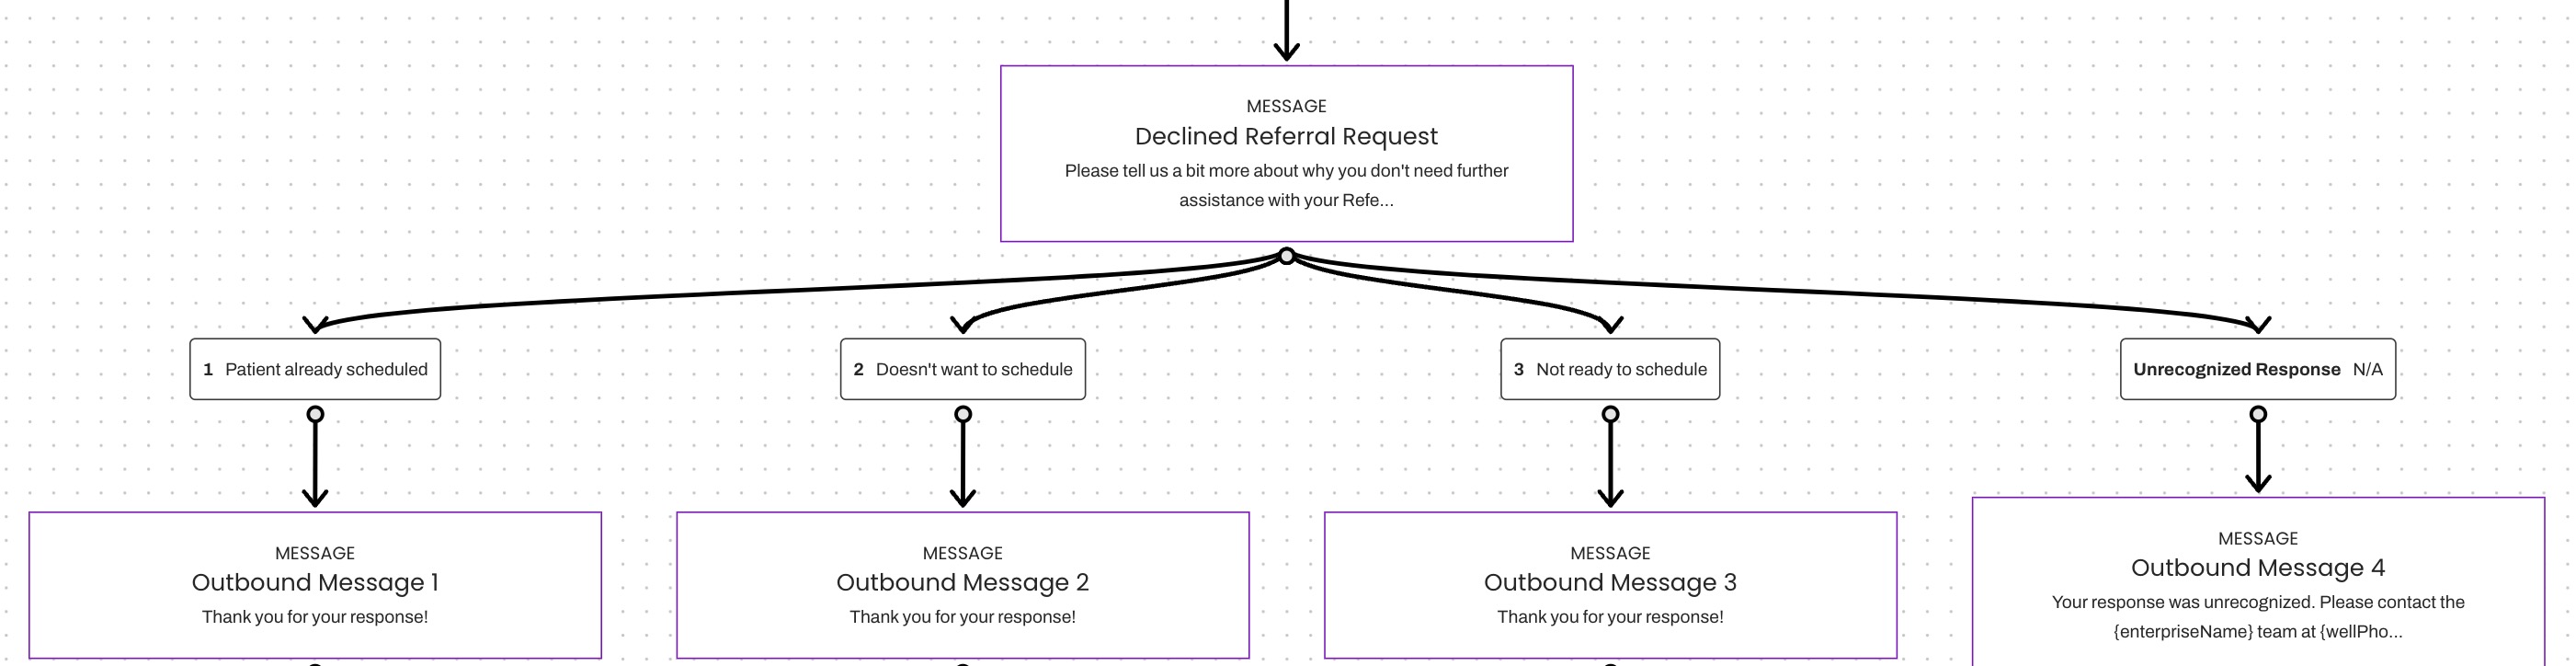
- Similar to the Root message configuration, add your Outgoing Message and identify the expected Patient Responses. Be sure to associate the Patient Responses and click Update. Including an Unrecognized Response option allows you to automatically take action on any messages that fall outside of the defined Patient Responses.
-
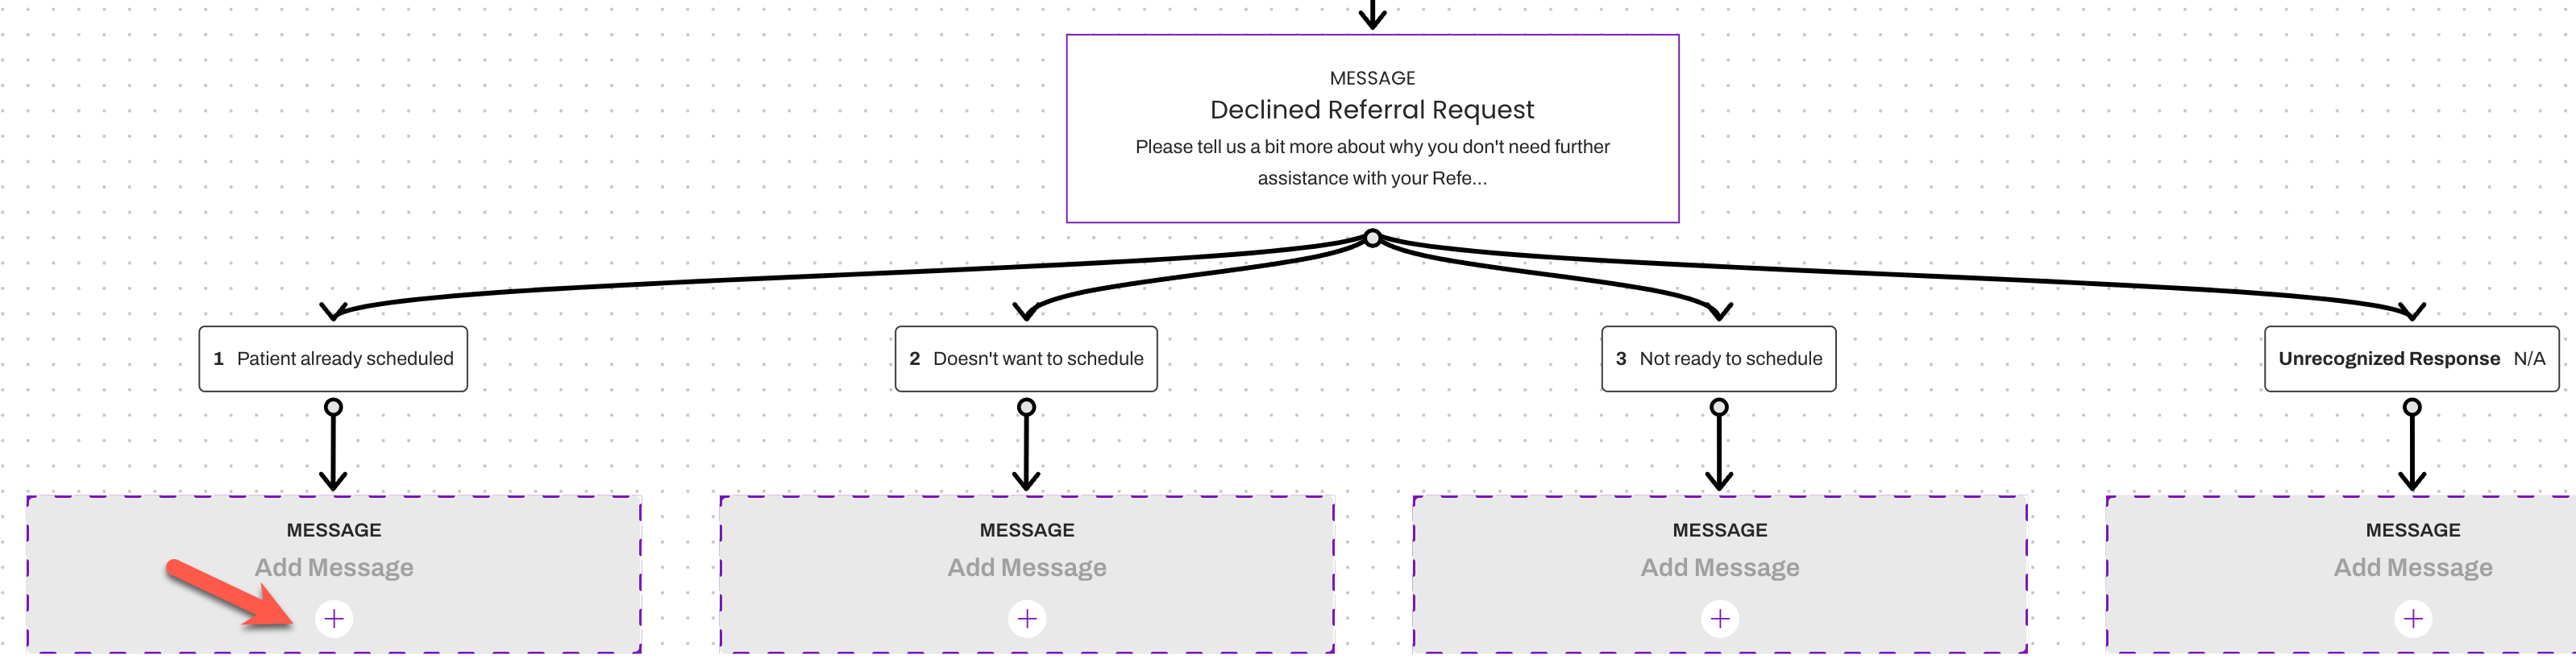
Now, let’s add the next message associated with the '1' Patient Response.
-
Enter the desired Outgoing Message and click update. Repeat for the other three Patient Response options.
- Next, let's define the 'Yes' Response option we established from the Root Message. We will add the next message by navigating to the gray Add Message box within the 'Yes' Patient Response branch and select the '+'.
- Add the message and click Update
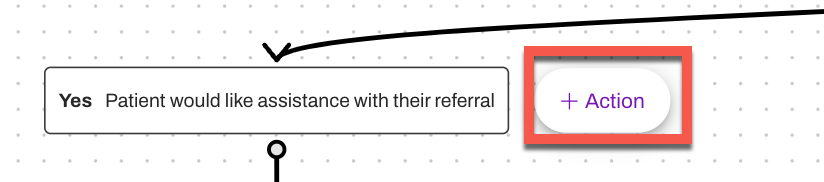
- Add an Action for the 'Yes' Patient Response to tag a team member in the Patient's Channel. Add the Action by hovering over the Patient Response and select '+ Action'
- Once all information has been entered and validated, select Create in the upper right corner to create the Conversation.
Spanish Translations
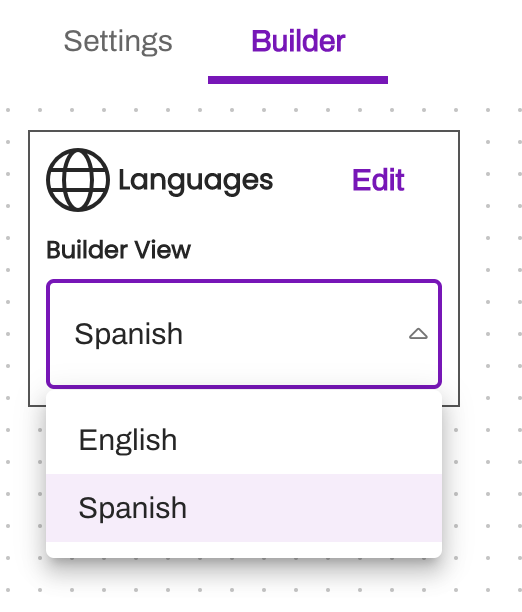
If you elected to include a Spanish translation, you can view those translations by toggling the language buttons:
 Edit Text
To update the translated text, click on the appropriate Message box and edit the Spanish translation. It is highly recommended to verify your translations with a proficient speaker. Select Update once done.
Adding Phone Conversation
If you would like to run the same conversation but using Voice instead of SMS, create a new Conversation matching the previous SMS Conversation. Use the same Smart Phrase and for Communication Methods, choose Phone Call.
Verbiage Differences
When building Call conversations, it can be helpful to update the Patient Responses to numbers, e.g. instead of responding “No” to decline, use press “5” to decline. This makes it easier for patients to choose the correct response option.
Call Forwarding
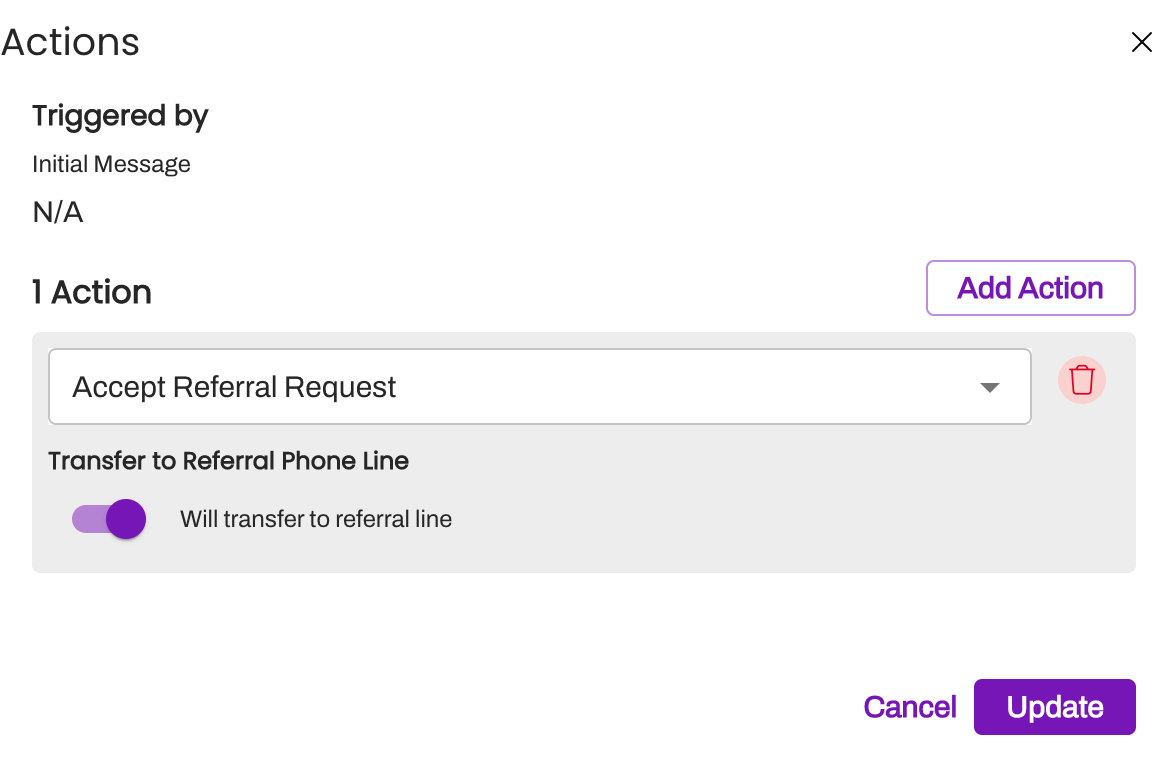
Depending on your workflow, you may find it helpful to use the Action Type of Accept Referral Request. Choosing Accept Referral Request will write back the patient's acceptance of the Referral to your EMR. You will also be asked to choose whether you would like to “Transfer to Referral Phone Line":
Toggle this field on (purple) to transfer the phone call to the Line that sent the Automation
Leave this field off (default) to keep the phone call on the current Line
Enable Conversation
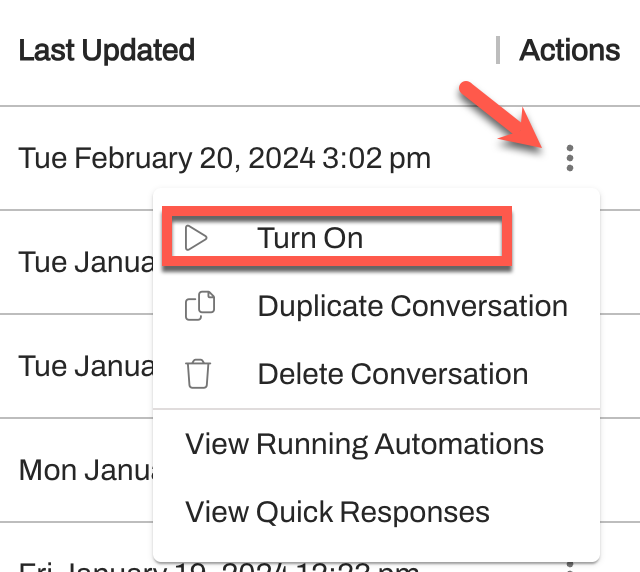
When you have completed your Conversation build, select the Conversation's (...) Actions menu and choose Turn On.
 Adding Conversation Builder Smart Phrases in Automations
Once you have created and enabled your Conversation, the next step is to add it to your Referral Automations. For a deep dive into creating Referral Automations, check out these articles: Default Automations | Practice Automations.
- Configure your Automation, as desired.
-
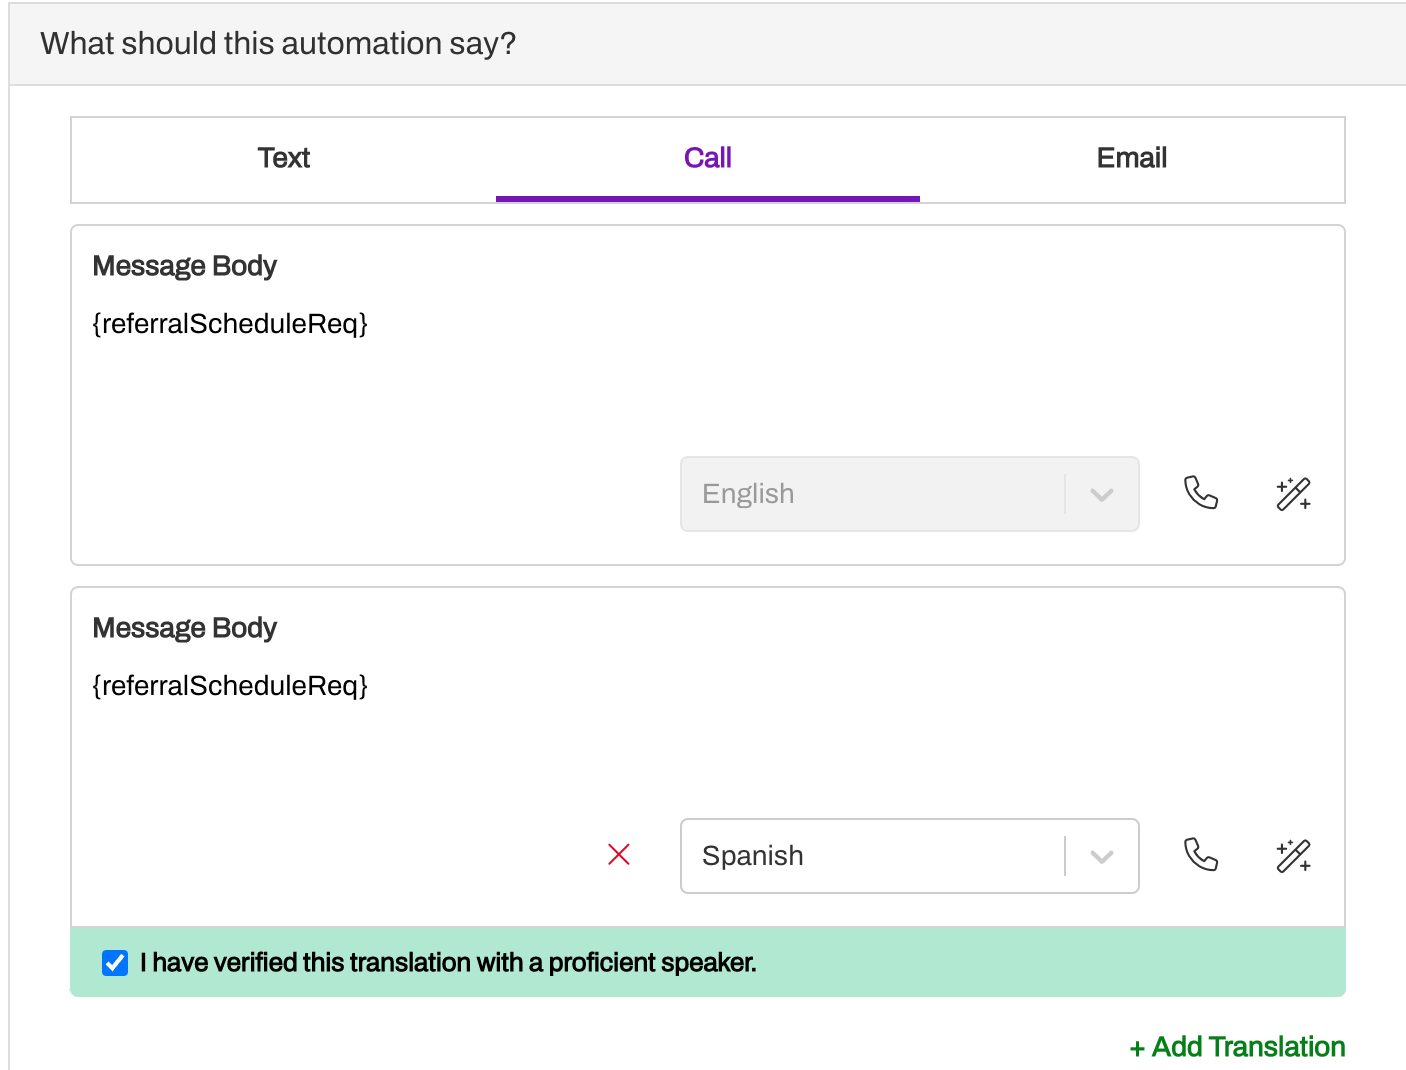
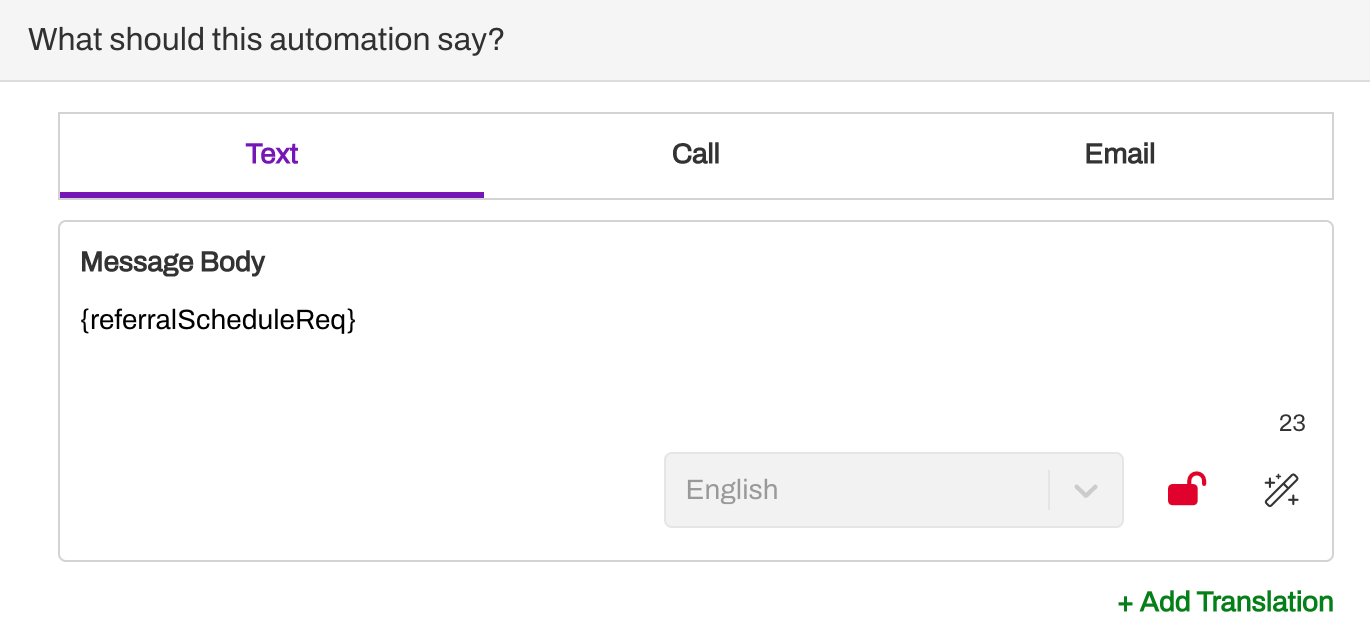
When you reach the “What should this automation say? section, add the Conversation's Smart Phrase within two curly brackets {}.
-
If you have included English and Spanish Translations, ensure that you add the Smart Phrase into the Spanish Translation box as shown. Tip: Make sure your translation is following the same security setting as the English version (Secure or Unsecure).
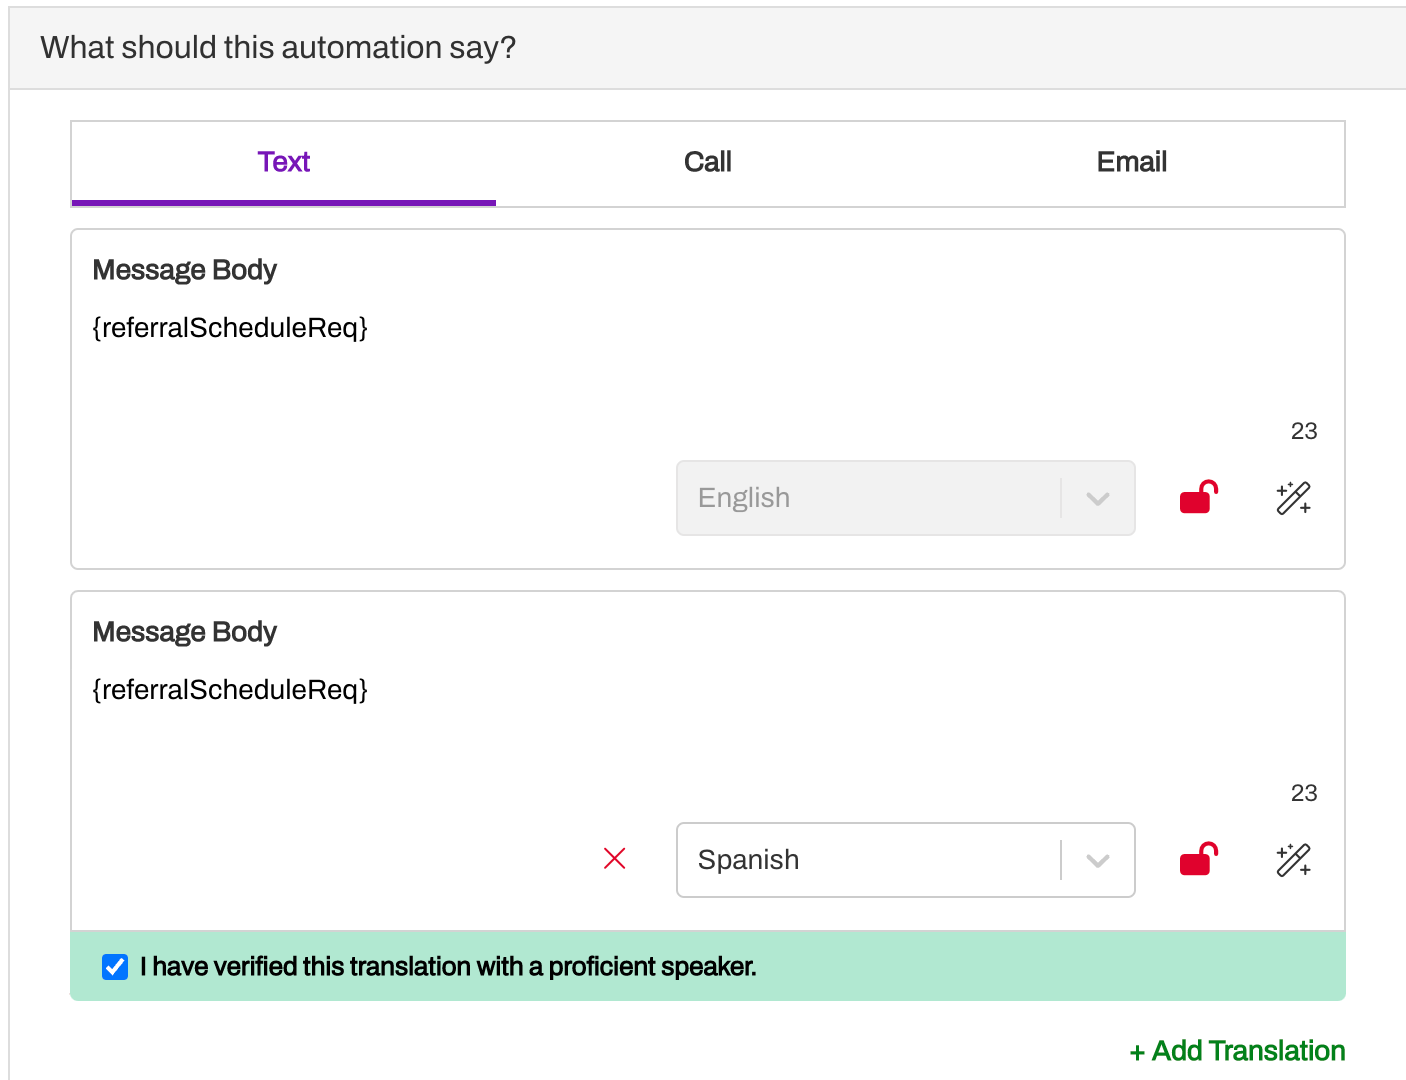
- If you do not add the Translation, the initial Automation message (Root Message) will be delivered in English to the patient with any subsequent messages in the Conversation delivered in Spanish.
-
Next, if you have created a Phone Call version of the Conversation, include the Smart Phrase in the Call section as shown, also respecting Translations, if included.