Community Outreach Overview and Setup
- Get Started
- Automations
- Patient Channel
- Patient Facesheet
- Collaborative Inbox
- Lines & Resources Requests
- Lines, Events, Resources
- Analytics
- Platform Settings and Configuration
- Users and Groups
- Campaigns
- SMS Basics
- Troubleshooting and FAQ
- Conversation Builder
- Add-Ons
- Release Notes
- Technical Specifications
- Referrals
- Self-Rescheduling
- Recalls
- Marketplace
Table of Contents
Community Outreach SetupSettings and UsersDefault SettingsPractice SettingsAdd UsersAutomations and Quick Responses (Optional)Inbound Message AutomationsQuick ResponsesArtera's Community Outreach solution helps organizations reach out to their assigned member lists using Campaigns.
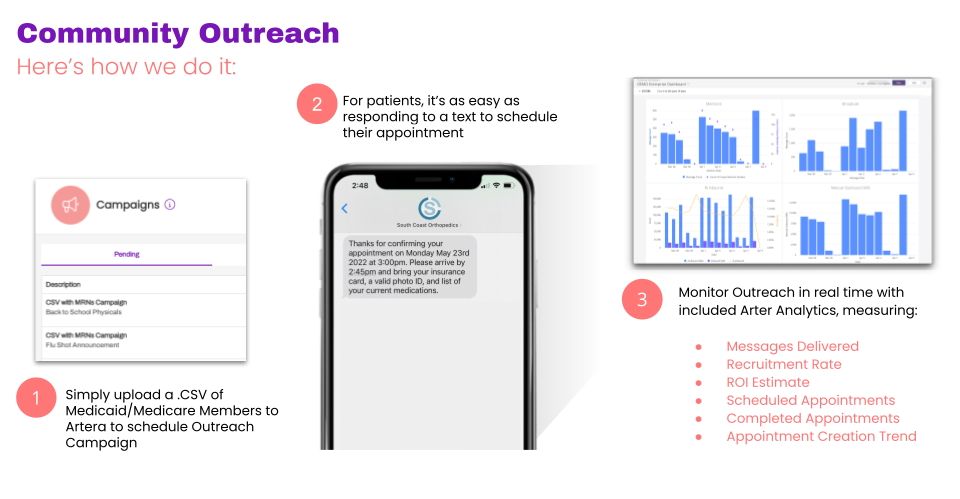
Value of Campaigns for Community Outreach
With Campaigns, you can create and send large volume outreach—up to 30,000 members per Campaign—and stop building call and mailing lists.
Additionally:
Campaigns can be pre-scheduled to send on a specific date, allowing you to more efficiently meet messaging needs.
Multiple Campaigns (up to 4) can run concurrently within an Artera Enterprise, allowing you to send custom messages to different member lists.
Choose how fast your Campaigns send messages (12 to 2,496 messages per hour) and which hours Campaigns can send messages.
Community Outreach Setup
You will work with your Project Manager to complete your Community Outreach setup. The standard implementation timeline is 4 weeks. The steps include:
Create a standalone Community Outreach Enterprise: Community Outreach Enterprises are separate from your standard Artera Enterprise and typically contain a single Practice. This ensures we are not populating non-patients into your existing Enterprise.
Complete the Member Import Template using a unique Member ID system (must be different from MRN/Patient ID system used in your standard Enterprise).
Determine Login Strategy: You cannot use the same email address used to log in to your other Artera Enterprise. Additionally, if you use SSO for your standard Enterprise, you cannot enable SSO for your Community Outreach Enterprise unless a different email domain is used.
Identify Phone Line Strategy: Artera can purchase a Line for you or you can text-enable an existing landline.
Create SFTP Exchange: Artera or the customer can host the SFTP site. If Artera hosts the SFTP site, credentials will be sent to you upon creation. You will also determine how often you want the data to transfer to Artera. We recommend daily.
User Acceptance Testing: Test SFTP file exchange and Campaign messaging in your Artera Demo environment.
Settings and Users: Create users in Production and establish Enterprise and Practice Settings.
Settings and Users
Once you have completed the User Acceptance Testing process, you can complete the following in your Community Outreach Production environment.
Default Settings
The following settings should be considered:
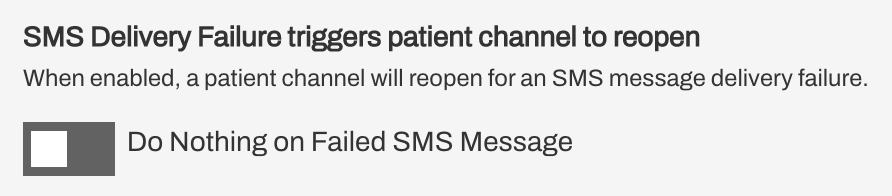
SMS Delivery Failure triggers patient channel to reopen
We recommend turning this setting off as—when enabled—failed messages to a member will open the Patient Channel. With Member lists, we recognize that the contact data provided may not be super accurate and we do not want to clutter the Collaborative Inbox with failed messages.
User Sign-out Security
Enabling Session Timeout facilitates an automatic logout process for the user after the chosen number of inactive minutes. If you enable this setting, the most common timeout is 60 minutes. Keeping users logged in helps maintain quick response times, as logged-out users do not receive new message alerts.
 You may choose to disable this functionality if the user's computer automatically locks after an established inactive duration. If you disable the timeout setting, make sure to train users to log out of Artera when away from their workstations.
Practice Settings
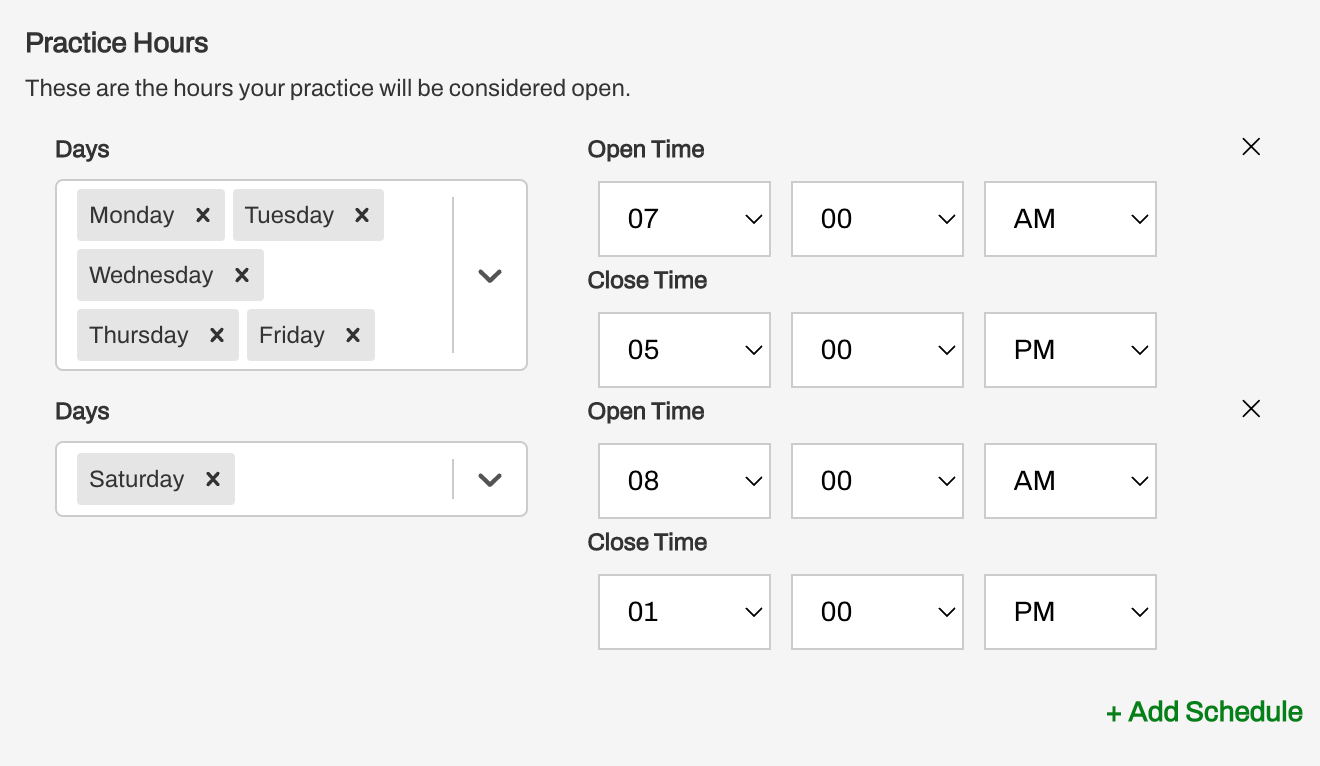
Add Practice Hours if you would like to send an automatic After-Hours Auto-Response to members who message in outside your standard business hours.
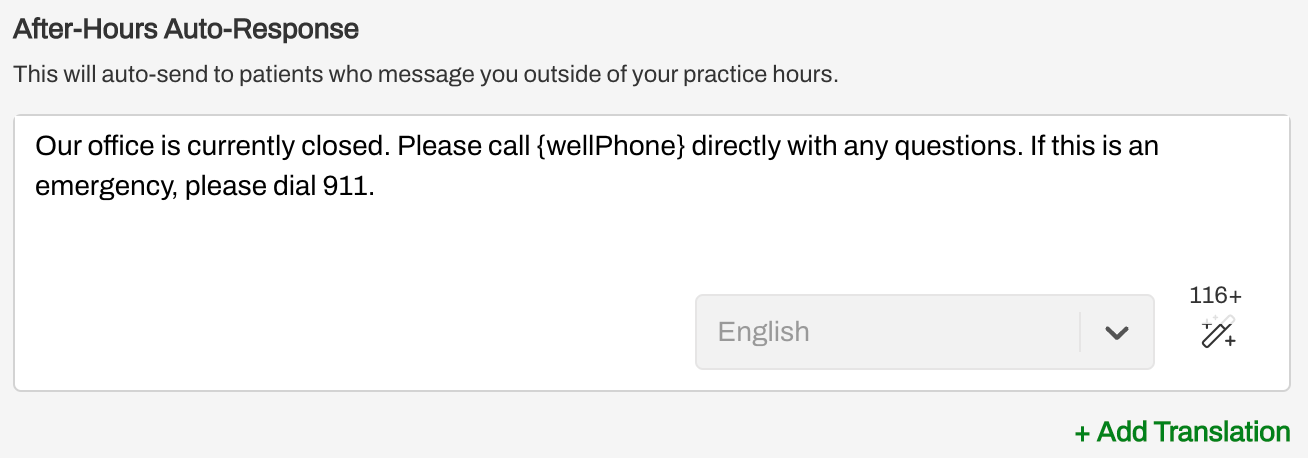
Then, add your After-Hours Auto-Response.
 Add Users
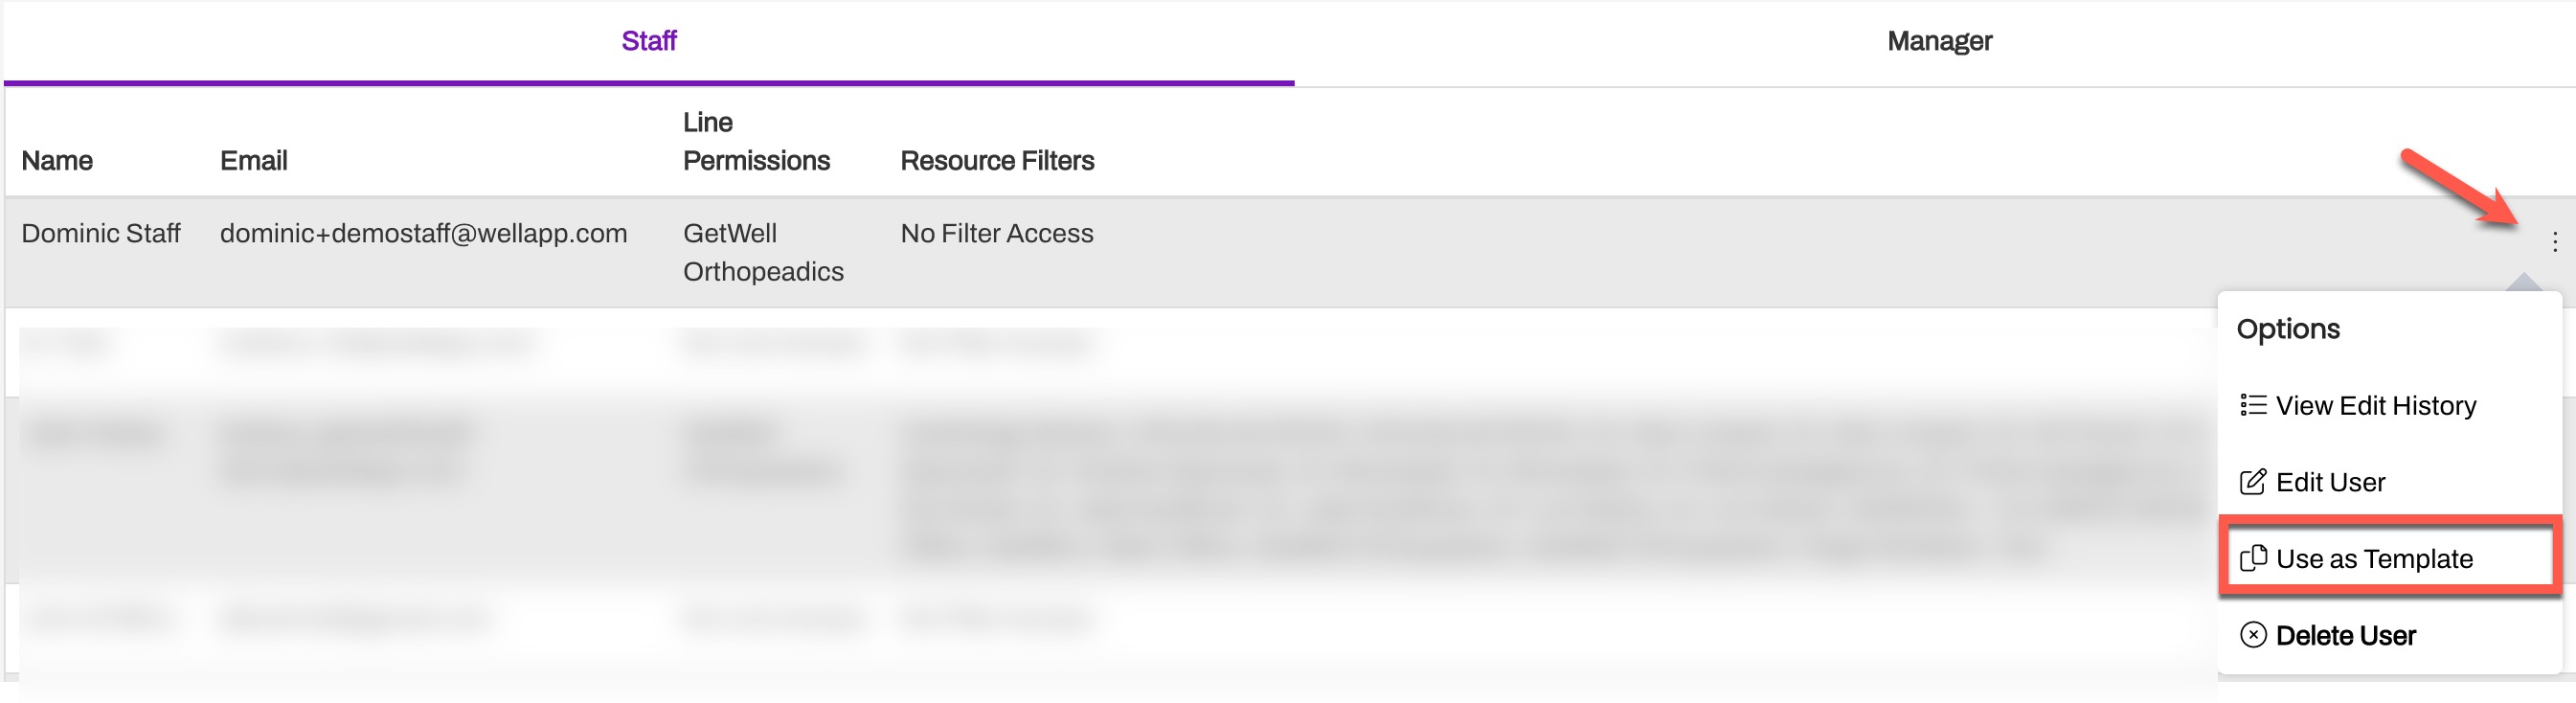
- Add Staff and Manager users to the Practice. Click here to learn more about adding Staff and Manager users.
- Navigate to Settings > Practice Settings > Users.
-
Add Staff User
- Enter the First Name, Last Name, Email Address, and select the Line from the drop-down. Since this is a Campaign-specific Practice, you do not need to associate Resources with the user.
- Tip: Use an existing user as a template to speed up new user creation
-
Add Manager User
- Enter the First Name, Last Name, and Email Address. Managers will automatically have access to all Lines within the Practice.
Automations and Quick Responses (Optional)
You can set up Inbound Message Automations and/or Quick Responses for your Community Outreach needs.
Inbound Message Automations
You can configure Artera to send an automatic response to the member's request for an appointment to let them know someone will be with them soon to get them scheduled.
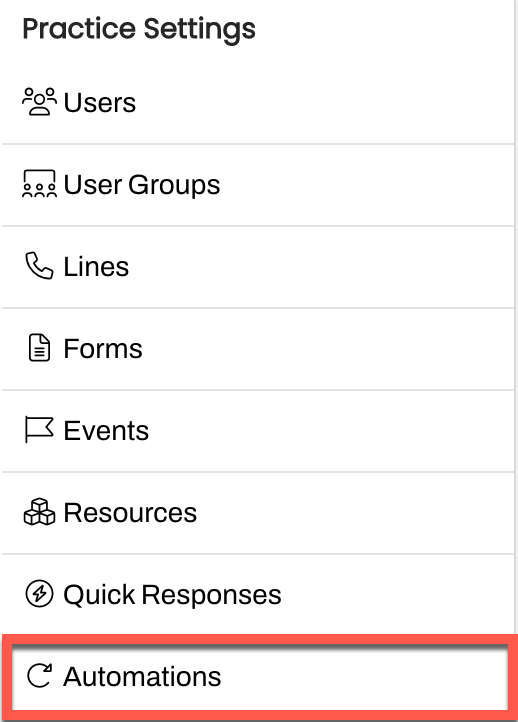
Navigate to Practice Settings > Automations.
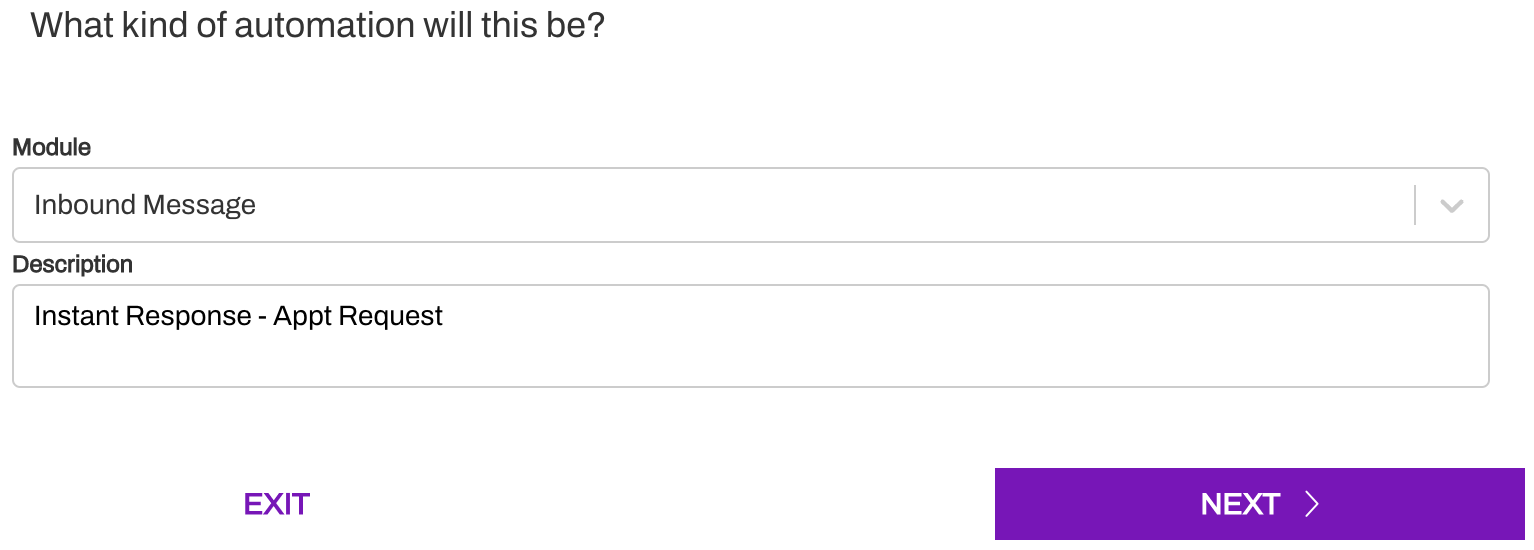
Create a new Automation and choose Inbound Message from the Module drop-down
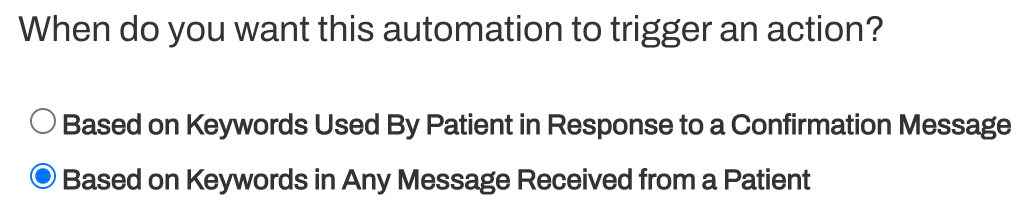
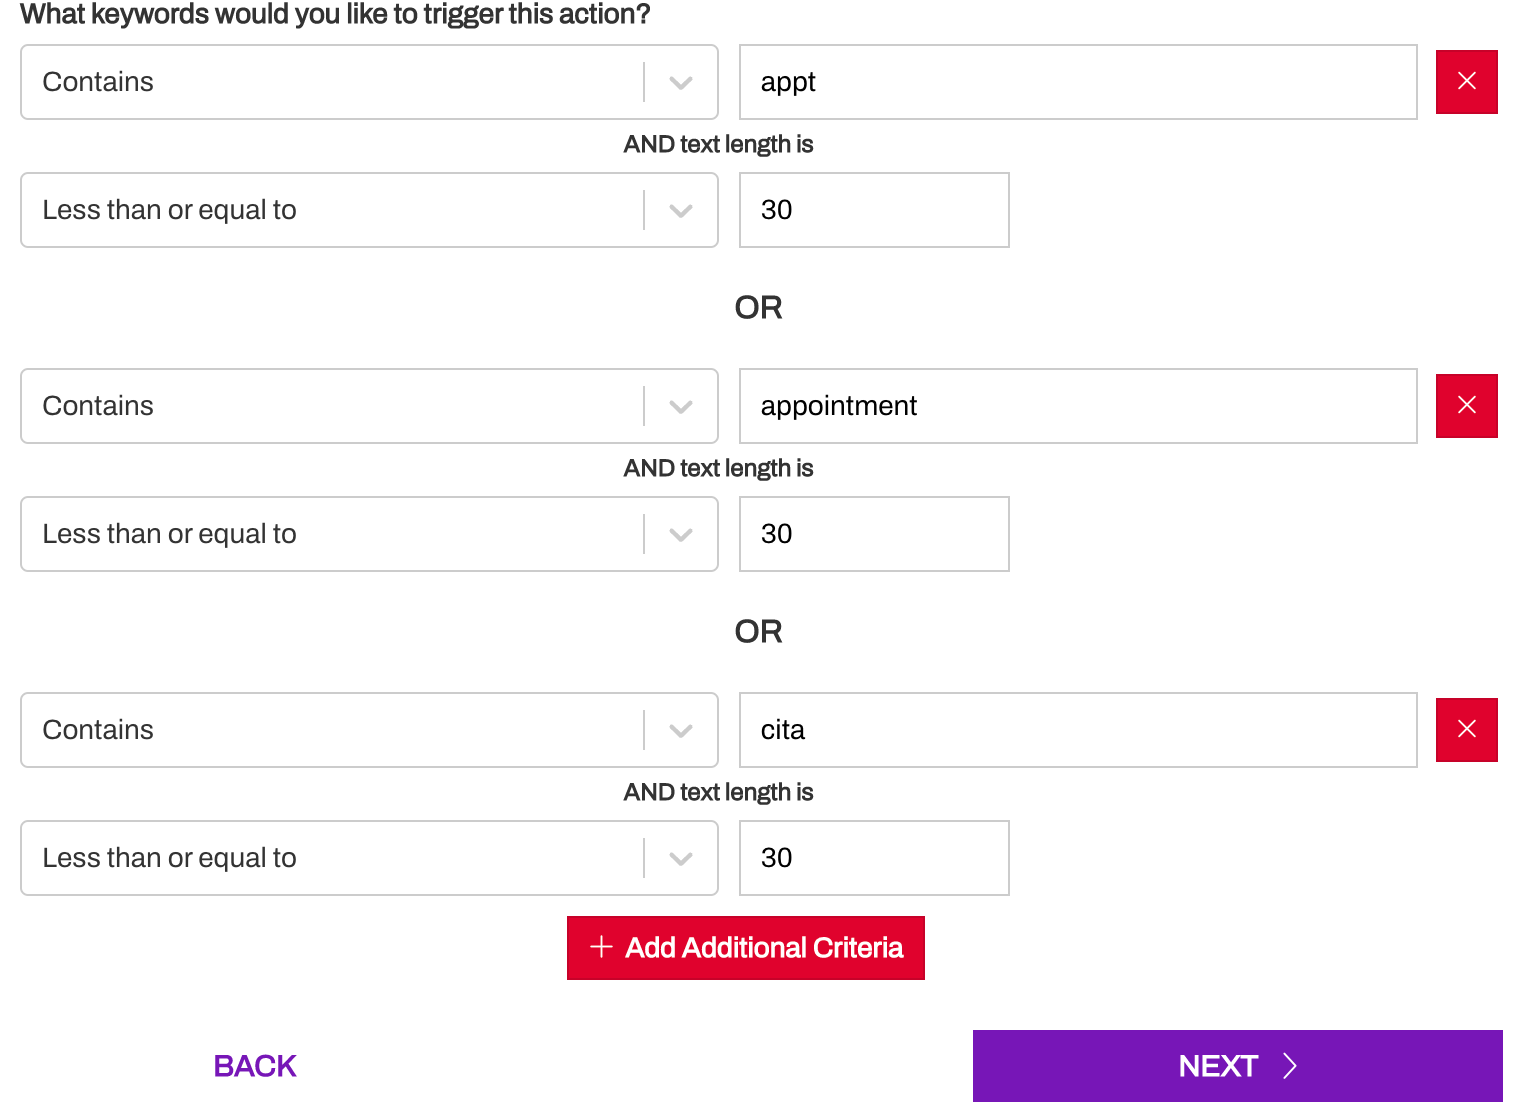
Choose Based on Keywords in Any Message Received from a Patient, since none of the messages from this Practice will use the confirmation Smart Phrases.
Next, select the Community Outreach Line.

Choose the keywords that will automatically send the message. Since we want to focus on people who are requesting appointments, we will choose Appt and Appointment. For text length, we recommend less than or equal to 30. Remember, if you are reaching out to a multi-lingual list of members, also include the appointment translations as well, e.g. “cita” for Spanish speakers.
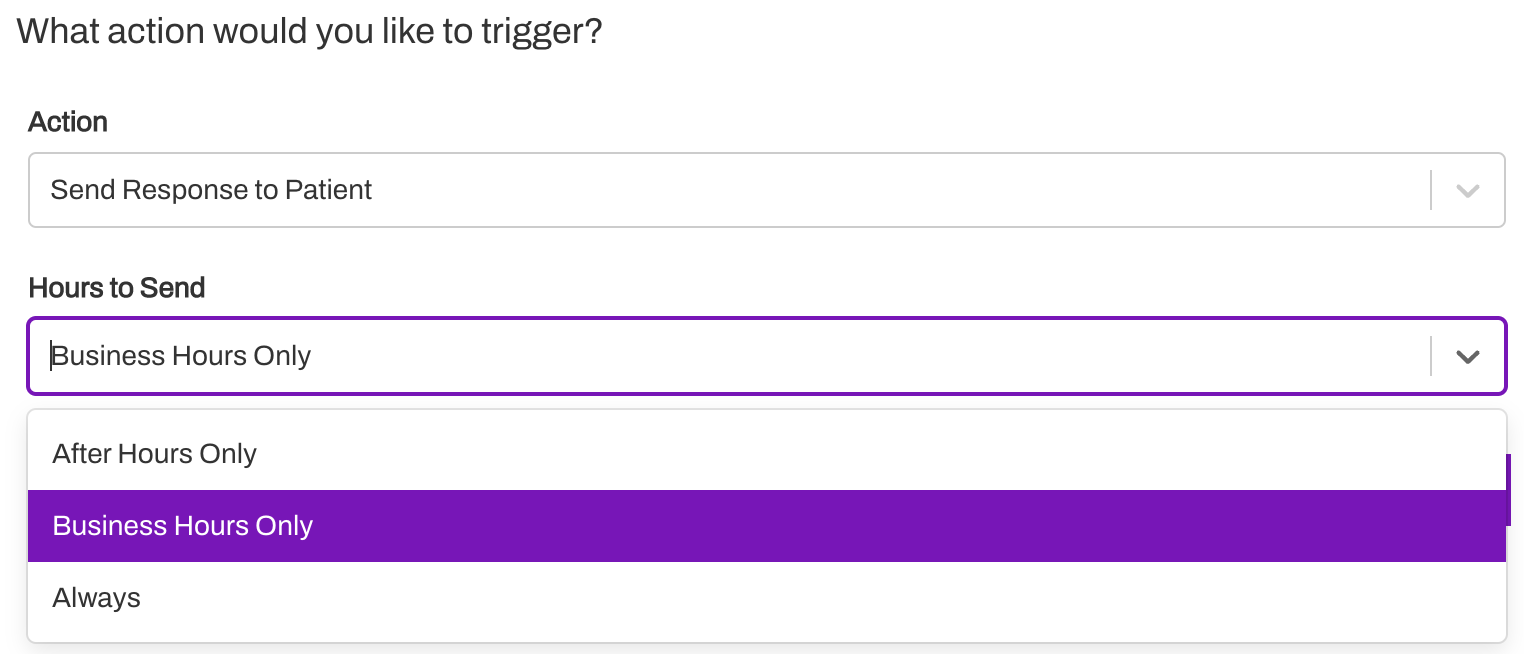
Choose Send Response to Patient for the Action and set the Hours to Send. This will depend on whether you have chosen to include Practice Hours. If you are using Practice Hours and a related After-Hours Auto-Response, choose Business Hours Only. Otherwise, select Always.
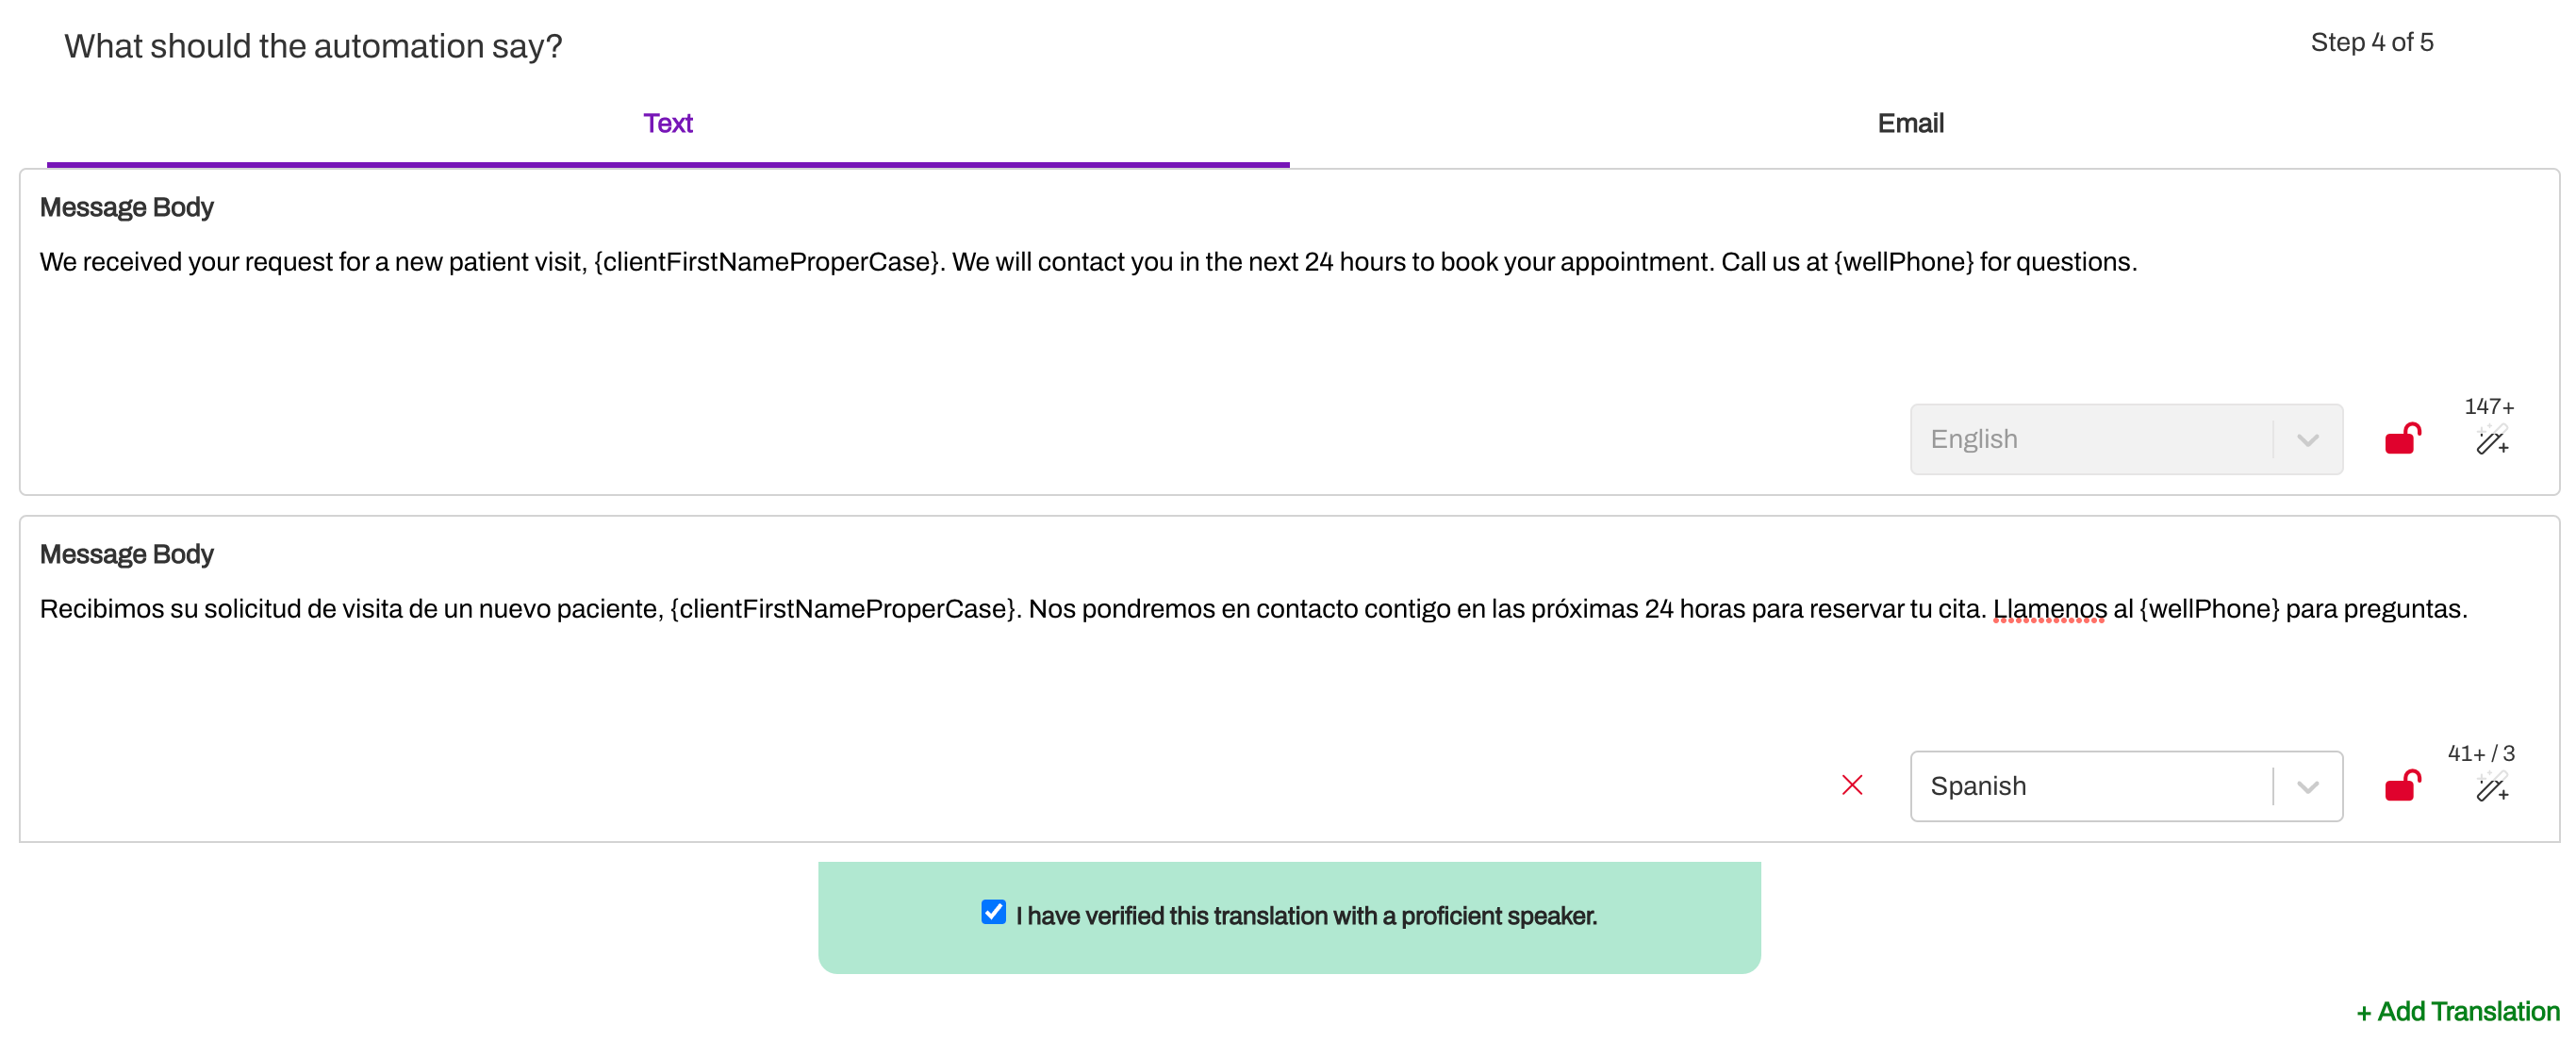
Next, create the message that will be sent in response to the message received from the member. Remember to add any supported translations and ensure the message(s) are unlocked.
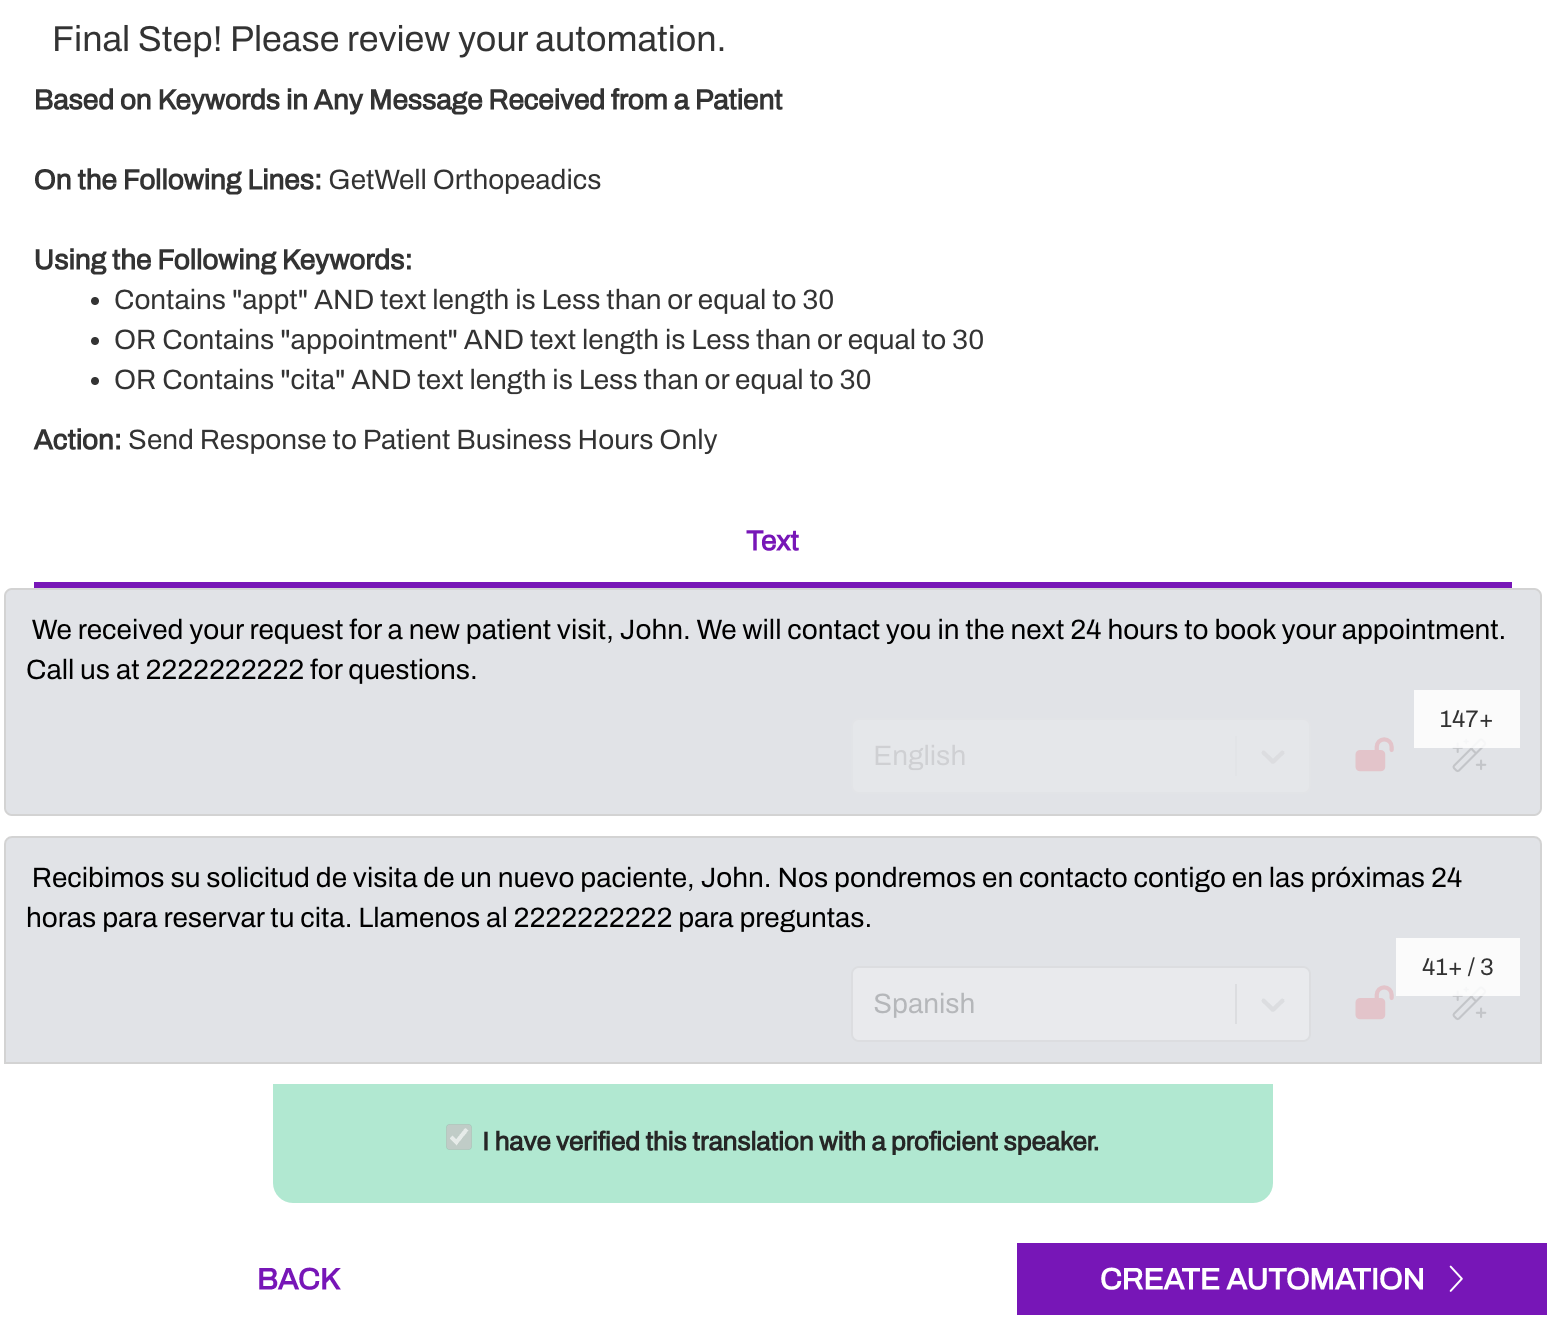
Next, review the Automation setup and confirm the details. Click Create Automation.
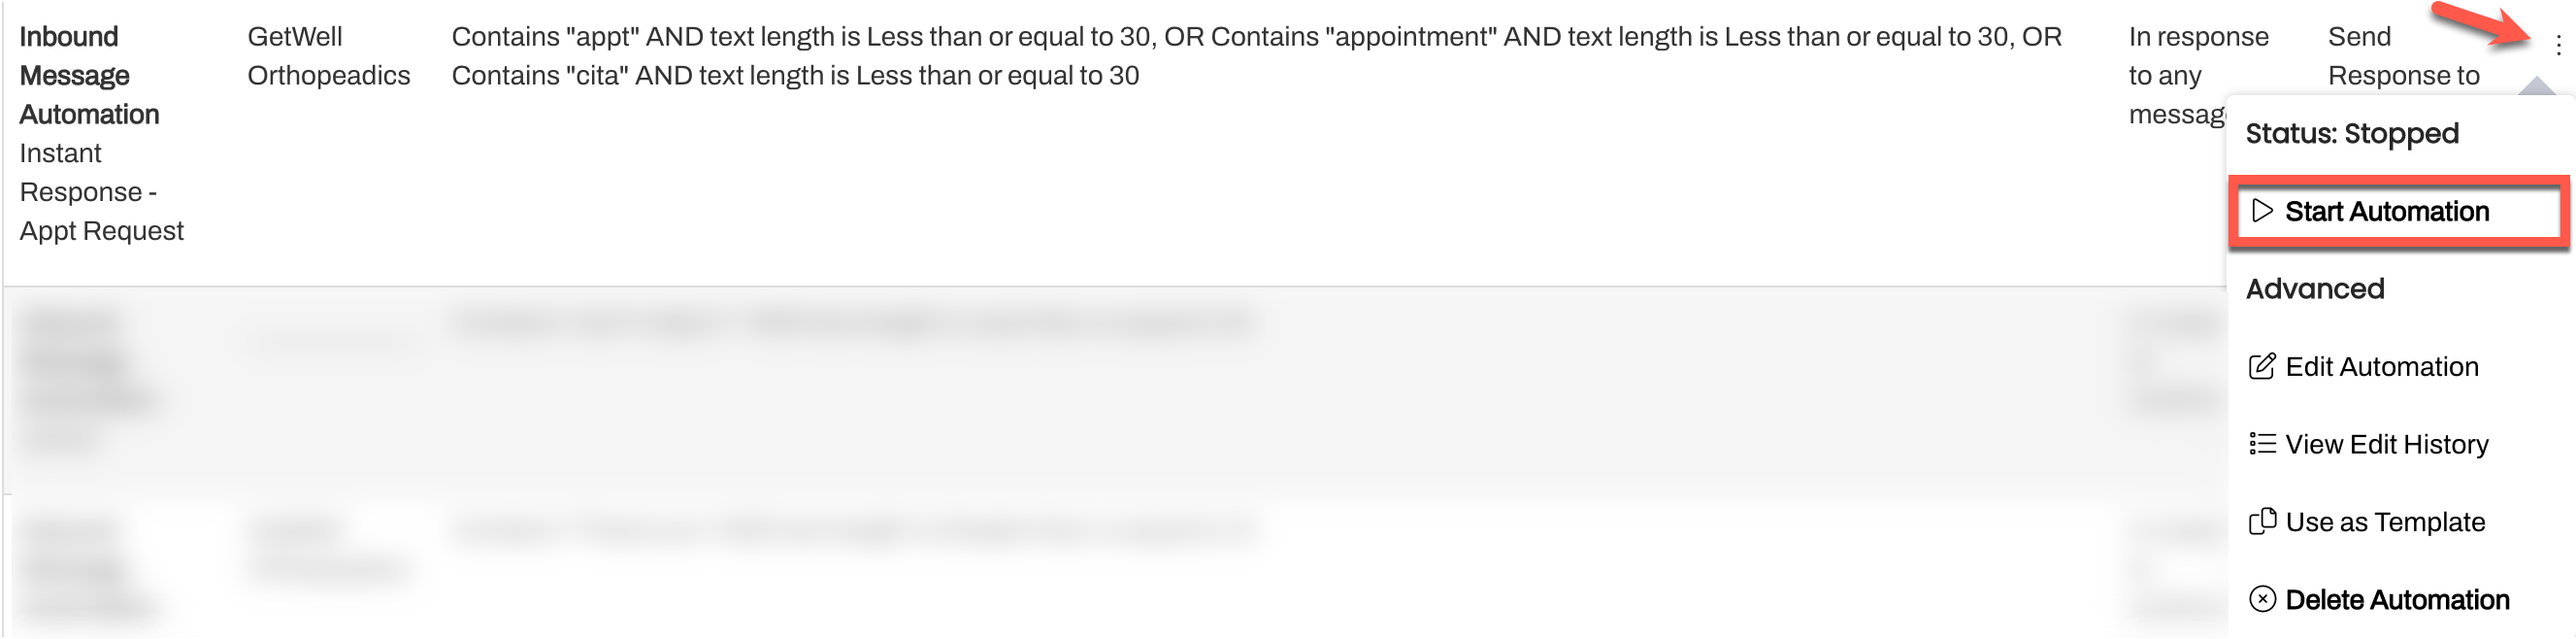
Next, locate the Automation in the Paused tab and use the (...) menu to select Start Automation.
Quick Responses
You can set up Quick Responses to provide users with answers to commonly asked questions by members or commonly used outbound messages sent to members. For example, a common message may include giving a member a heads up that a team member will be reaching out to them shortly.
Sample Quick Responses
Hello {clientFirstNameProperCase}, a representative will be reaching out to you shortly!
Hi {clientFirstNameProperCase}, your treatment location is West Medical Clinic at 123 S. Broadway.